What Is a “Seam Allowance”? (SA Definition and Core Meaning)
The seam allowance, often abbreviated as SA, is the area of fabric between the seam stitching line and the raw cut edge of the fabric piece. This extra margin isn’t visible on finished garments: it’s inside, folded or pressed under the joining seam. The main seam allowance meaning is this: it provides space for joining pieces securely, ensures garment durability, and protects against fraying or seam slippage. SA values are specified on patterns and tech packs, which guide the cutting and sewing process in apparel factories and home workshops alike.
Key Elements of a Seam Allowance
- Location: Always measured from the stitching line to the raw edge.
- Width: Specified in millimeters or inches; typical values range from 3mm (fine dress seams) to 25mm+ (heavy-duty outerwear).
- Purpose: Provides structural integrity, flexibility for adjustments, and supports finishing techniques (overlocking, binding, etc.).
Why Is Seam Allowance Important in Garment Production?
Seam allowance isn’t just about construction ease; it’s essential for several reasons. Understanding the correct SA meaning underpins high-quality, consistent garments—especially in bulk production. From the Apparel Wiki and real export factory experience, these are the top reasons:
- Tolerance for Assembly: SAs give operators margin to align, join, and finish panels without risking weak or exposed seams.
- Durability & Strength: Adequate SAs help prevent seam slippage, especially in stress areas like crotches or armholes.
- Fit & Consistency: Strict control of SA ensures finished garment measurements match the approved specs. Even a few millimeters off in SA can alter chest, waist, or sleeve width.
- Support for Finishing: SAs make it possible to apply different seam finishes (overlock, binding, French seam), each needing enough fabric margin.
Rain’s tip from the production line: “If your finished garment measurements are inconsistent batch-to-batch, check if seam allowances are being trimmed, stretched, or mis-sewn somewhere in the sewing line. Tight SAs and sloppy handling cause quality headaches that ripple into returns and rework.”
Common Seam Allowance Values (Practical References & Table)
There is no universal SA value; it depends on fabric type, stitch, and garment use. The table below summarizes common standards seen in both industrial and home sewing:
| Seam Area | Typical SA (mm) | Fabric Type/Construction | Usual Seam/Finish | Notable Applications |
|---|---|---|---|---|
| Side & Body Seams | 10–15 | Knit & Woven | Overlock + Topstitch | T-shirts, polos, shirts |
| Armhole/Sleeve Join | 10–12 | Light-Medium | Overlock or Binding | Tees, hoodies, dresses |
| Collars & Cuffs | 6–8 | Woven shirts | Lockstitch | Dress shirts, blouses |
| Hem Allowance | 18–25 | Jersey, fleece, denim | Coverstitch, turn up | Tees, sweatpants |
| French Seams | 15–20 | Sheers, delicates | Enclosed seam | Blouses, lingerie |
| Enclosed Seams (Facings) | 8–12 | Most wovens | Turned/stitched | Necklines, plackets |
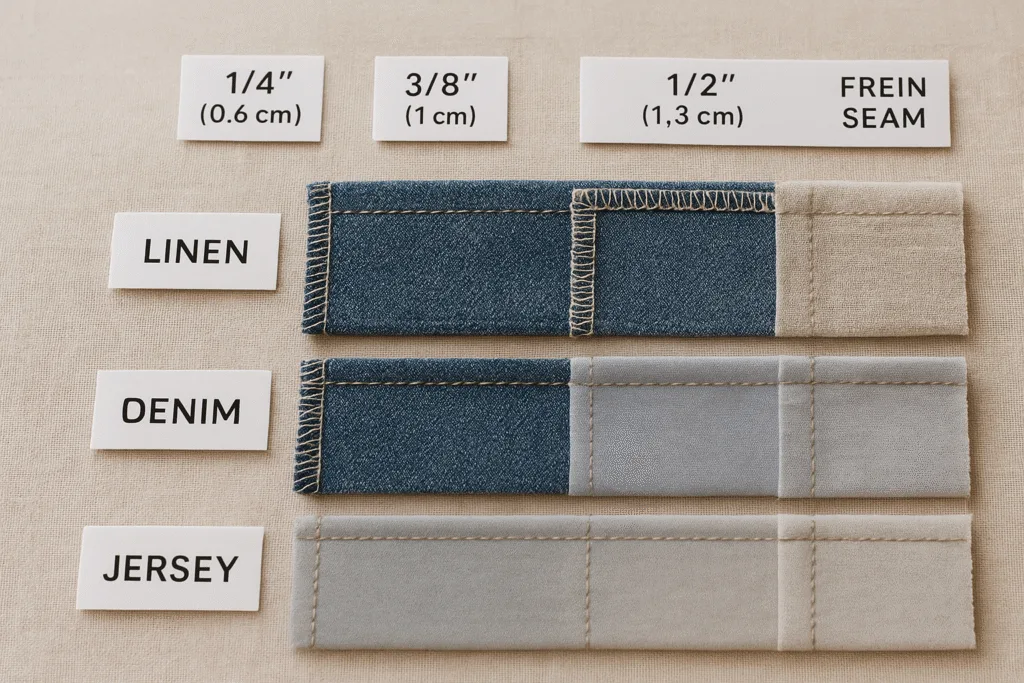
Always check the tech pack or pattern’s specified SA, as bulk orders can call for custom seam allowances to match fit or sewing equipment. For home sewing, 1/4”, 3/8”, or 5/8” (6.5mm, 10mm, or 15mm) are the most common references.
Seam Allowance Variations by Fabric, Stitch, and Garment Type
The right SA depends on several real-world factors. Here’s how factories—and you—should approach it:
By Fabric Type
- Knits (Single Jersey, Rib, Interlock): Usually 6–10mm; too wide can distort seams, while too narrow risks rolling or breakage.
- Wovens (Poplin, Twill, Denim): 10–15mm is common. Heavy denims or canvas: up to 20mm for stress-prone areas.
- Lightweight/Sheer Fabrics: Use wider SAs (up to 15-20mm) for French or enclosed seams to avoid fraying and to reinforce joins.
By Stitch Type
- Overlock (504/514): 6–8mm. Too wide wastes fabric; too narrow weakens the join.
- Flatlock (sportswear): Minimal SA—often 4–6mm for bulk reduction and style.
- Lockstitch (ISO 301): Typically 10–12mm, used in most shirt making for crisp seams.
By Garment/Construction
- T-shirts & Polos: 7–10mm at sides/shoulders, 18–20mm on hems.
- Shirts/Blouses: 12–15mm body seams, 8mm collar/cuff.
- Outerwear (Hoodies, Jackets): Up to 20mm for ruggedness or later alteration.
- Kidswear: Often uses extra SA for easy let-out as the child grows.
Seam Allowance in Patternmaking: Marking, Cutting, and QC
For both home sewers and factory technicians, managing SAs from blueprint (pattern) to finished product is central to quality. Failure to control SAs leads to inconsistent sizing, visible puckering, or defective joining:
Pattern Development
- Block Patterns: Usually drawn to actual body measurements (no SA included). SA is added for each joining edge before sample or bulk cutting.
- Working Patterns: Always check if SAs are “included” or “added”—misunderstandings here cause costly errors.
Fabric Cutting
- Auto-cutters and manual knife cutting must strictly follow the SA-specified pattern. Factory tolerance: typically ±2mm for knits, ±1.5mm for wovens.
- Labels/tickets in bundles should clearly state “SA included” so operators don’t second-guess margins.
Quality Control
- Inline QC staff measure both seam width and finished garment specs. Consistent SAs mean consistent garments.
- If SA is trimmed too narrow, seam strength drops; trimmed too wide, fit or drape will suffer.
How Beginners Should Handle Seam Allowance (Step-by-Step Advice)
If you’re new to sewing or fitting garments, seam allowance can be confusing. Here’s a beginner-friendly, factory-tested checklist for managing SAs on any project:
- Read Your Pattern Properly: Check if SAs are already included or not.
- Mark Clearly: Use tailor’s chalk or erasable pen to draw both stitching and cutting lines if you’re unsure.
- Cut Precisely: Stick closely to the SA guideline, especially on curves and corners.
- Practice Different Seams: Try overlock, French, and lockstitch seams on scrap to see how SA affects strength and finish.
- Check Finished Garment Against Spec: Measure to see if the expected finished width, length, or circumference is achieved.
- Adjust as Needed: Beginners may need to increase SAs for fiddly fabrics or tricky constructions until skills improve.
Factory practice: Seasoned operators use guides (e.g., seam tape, magnets, or engraved plates on industrial machines) to sew at a consistent SA. Home sewers can use seam guides or tape on their machine’s needle plate as well.
Common Mistakes with Seam Allowance and How to Avoid Them
Based on decades in production, these are the most frequent (and expensive) seam allowance mistakes seen in factories and home workshops:
- Using inconsistent SAs across different pieces—leads to mismatched panels and poor fit.
- Confusing “with” vs. “without” SA patterns—often results in wrong-sized garments.
- Trimming SA too narrow post-sewing—weakens seam, risking split during wash/use.
- Not grading/reducing SA at bulk points (e.g., collar stand, corners)—causes lumps and irregular silhouette.
- Forgetting to finish seam edges—accelerates fraying, especially on woven fabrics.
Most of these are solved by careful pattern marking, disciplined cutting, and practicing a standard stitching routine.
Seam Allowance and Garment Performance: What to Check and Test
Seam allowances are integral to a garment’s performance during wear and after washing. Apparel Wiki’s independent lab testing, combined with best practice from global manufacturers, shows that SAs contribute to:
- Dimensional Stability: Correct SAs reduce seam puckering or distortion after laundering (especially on knits).
- Seam Strength: SAs too small may not withstand daily stress or laundry cycles. Test using standard seam slippage tests.
- Neatness, Comfort, and Safety: Well-finished SAs, trimmed and covered as required, prevent chafing or exposed threads—vital in activewear and childrenswear.
It’s best practice to subject prototypes to both repeated washing and stress testing before finalizing SA values for mass production. For critical workwear and childrenswear, adherence to OEKO-TEX® or equivalent safety standards is essential (no exposed or rough seams, with adequate SA and proper finishing).
Seam Allowance in Apparel Sampling, Grading, and Size Tolerance
Before a production run, every measurement detail—especially SAs—must be locked down in tech packs and reviewed during size set approval. Here’s how SA impacts the development process:
Sampling
- PP (pre-production) samples should use exactly the SAs specified in the tech pack; during sample fitting, check seams for strength, stretch, appearance, and ease over the body.
Grading
- When grading patterns between sizes, SAs should remain constant. Only the body dimensions change, not the SA itself.
Size Tolerance
- Main body tolerances (width, length): ±1cm for knits, ±0.5cm for most wovens.
- Errors in SAs (cutting too wide/narrow): main cause of tolerance failures at bulk QC, leading to costly rework or rejection.
What Is a “Seam Allowance”?

To summarize the main points:
- The seam allowance (SA) is the strip of fabric between the stitching line and cut edge. It’s invisible from the outside but critical for construction strength, fit, and finishing.
- SA values depend on fabric, stitch, garment type, and production needs—ranging from 3–25mm in practical use.
- Consistent, correct SAs are non-negotiable for factory-level consistency and home sewing success. Always check patterns, measure during QC, and don’t cut corners!
If in doubt, start with 10mm (3/8”) SAs for knits and 15mm (5/8”) for basic woven garments—then adjust as you test, refine, and develop your sewing expertise. For professional and beginner alike, mastering seam allowances is the quiet skill behind every perfect seam.
Frequently Asked Questions
What is the standard seam allowance in garment production?
The standard seam allowance varies by fabric and seam type but is typically 10–15mm (3/8″–5/8″) for most side and body seams in both industrial and home sewing.
Why do some patterns include seam allowance and others do not?
Some patterns include seam allowance for convenience, simplifying cutting and sewing; others require you to add SA manually, offering greater flexibility for custom fit and adjustments.
Can you change the seam allowance on a pattern?
Yes, you can adjust seam allowances to suit your skill level, garment type, or finishing method, but remember to keep finished measurements consistent with the garment spec.
What happens if seam allowance is too narrow?
A seam allowance that is too narrow weakens the seam, increases risk of fraying, and makes it harder to apply effective seam finishes, especially on high-stress or stretch areas.
How do I mark and sew accurate seam allowances as a beginner?
Use clear markings (chalk, erasable pen), seam guides on your machine, and consistent stitching practices; practice helps develop muscle memory for even SAs.
Is seam allowance important in all types of garments?
Yes, seam allowance is essential in every garment—regardless of fabric, fit, or use—since it affects strength, durability, fit, and professional finish.