Introduction
Sleeve insertion, sewing sleeves, is a core aspect of garment construction that can dramatically impact fit, comfort, and the silhouette of finished clothing. Whether you’re a home sewist or working in a large-scale garment manufacturing facility, understanding the different techniques and considerations surrounding sleeve insertion will ensure a professional outcome. This comprehensive guide explores set-in, raglan, and drop shoulder sleeve techniques, touching on sleeve shapes, armhole balance, easing methods, and how factories optimize these steps for speed and accuracy.
Understanding Sleeve Insertion, Sewing Sleeves
Sleeve insertion, sewing sleeves, refers to attaching the sleeve piece to the main body of a garment. This process affects structure, fit, and the style of the finished item, and it varies with garment type and sleeve design. The techniques and decisions made at this stage can mean the difference between a tailored, comfortable shirt and one with restricted movement or uneven seams.
Common Sleeve Shapes and Their Characteristics
There is a diverse range of sleeve shapes in garment design, each bringing its own set of challenges for insertion and fit. The most common are the set-in sleeve (rounded, tailored armscye), raglan sleeve (diagonally joined with seams from the neckline to armpit), and drop shoulder (shoulder seam falls beyond the natural shoulder point). Choosing the right shape influences not just garment aesthetics, but production workflow and ease of assembly as well.
Set-In Sleeve Insertion Techniques
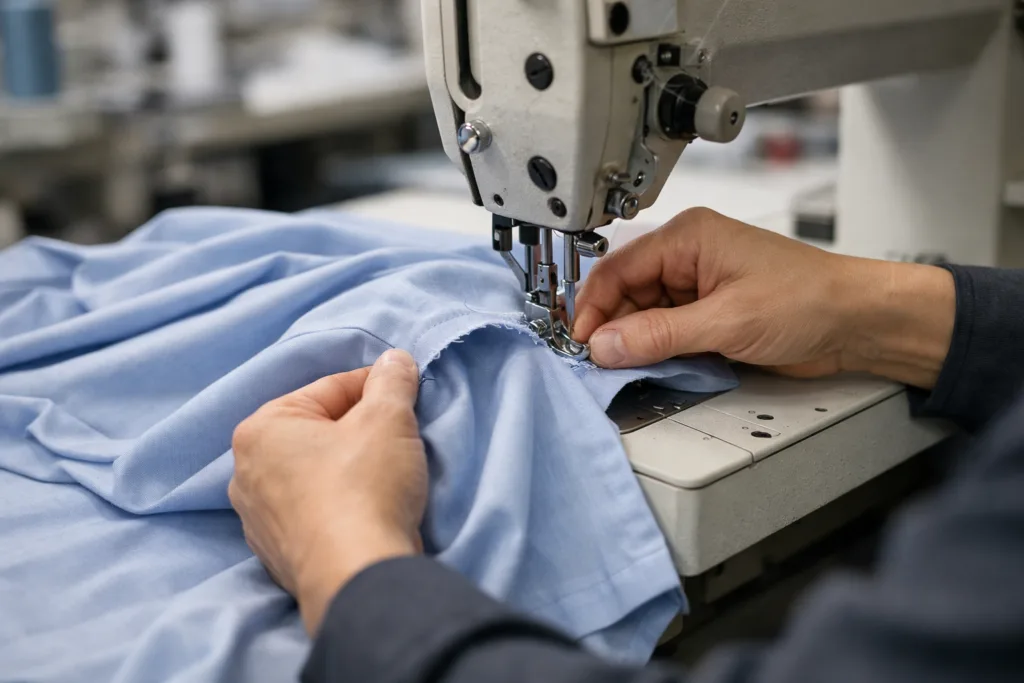
The set-in sleeve method is widely regarded for its tailored look. This technique involves attaching a rounded sleeve cap to a defined armhole. It usually requires easing excess fabric at the sleeve cap to ensure a smooth, puckered-free join. Set-in sleeves are commonly seen in dress shirts and tailored jackets, where precision is paramount. Many factories pre-sew the sleeve and body sections before the body side seam is closed, allowing for a flat and controllable insertion process.
Easing and Gathering in Set-In Sleeves
Proper easing, sometimes combined with gentle gathering stitches, is crucial to avoid puckers when inserting set-in sleeves. Easing distributes the sleeve cap’s slightly larger circumference to fit the smaller armhole without visible fullness. This is normally achieved with a long running stitch and light hand-tension pulling. Factories often use automated machines for uniformity, while skilled seamsters may use pin techniques for bespoke work.
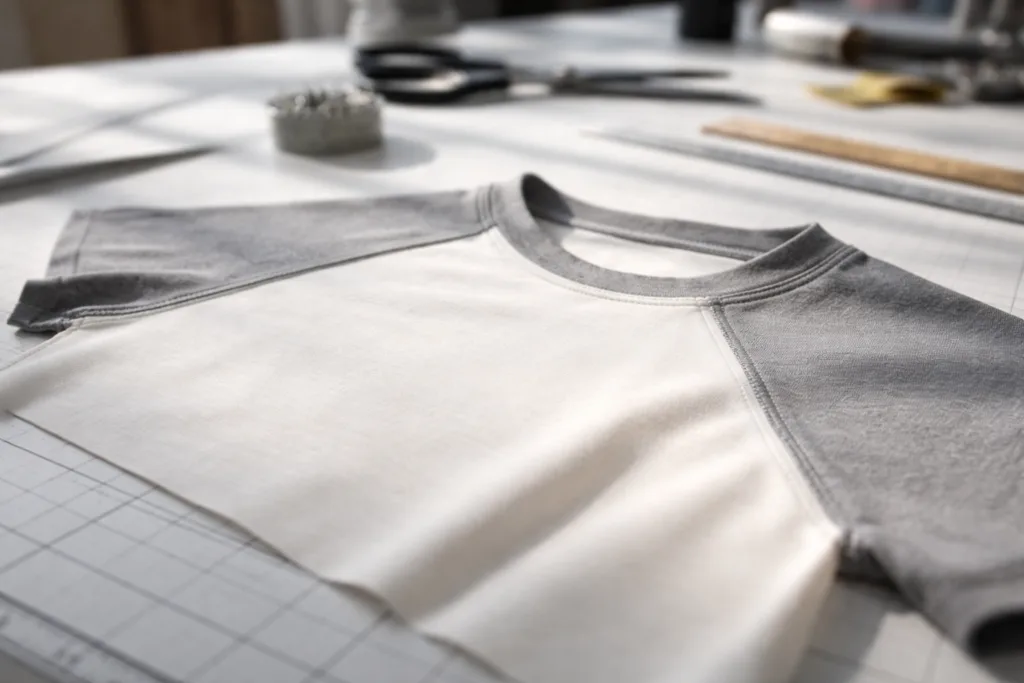
Raglan Sleeve Insertion Workflow
Raglan sleeves are notable for their diagonal seam lines, making them easier to sew in flat form than set-in sleeves. The sleeve and body panels are typically attached while flat, then the sleeve and side seams are closed in one sequence. This workflow increases efficiency and reduces opportunities for mismatches or puckers, especially beneficial in high-volume manufacturing. Raglan sleeves also offer more freedom of movement and a contemporary look.
Balancing Armhole and Sleeve Cap
Armhole balance is about ensuring the dimensions and curves of the sleeve cap and the body armhole align perfectly. Inaccurate shaping or cutting leads to a poor fit and visible pulling. Apparel Wiki notes that skilled pattern makers often adjust sleeve cap height and ease allowance based on fabric stretch and end use. Balancing these elements is a blend of pattern drafting know-how and production experience.
Sleeve Cap Height and Ease Allowance
The height of the sleeve cap directly impacts ease of movement and final garment shape. A higher sleeve cap produces a sharper, more tailored silhouette, while a lower cap is used for relaxed or drop shoulder styles. Ease allowance (extra circumference in the sleeve cap) must be distributed carefully to avoid puckers but ensure sufficient mobility. Typically, ease ranges from 1–2.5 cm for most set-in applications.
Drop Shoulder Sleeve Construction
Drop shoulder sleeves extend past the natural shoulder point, creating a relaxed or oversized fit. The insertion process for drop shoulder sleeves is usually straightforward, as the armhole is less curved and the sleeve head nearly flat. This design speeds up factory workflow and reduces sewing complexity. It’s popular in knitwear, oversized tees, and casualwear, where speed and a casual fit are desired.
Factory Workflow for Sleeve Insertion
Sleeve insertion, sewing sleeves, in a factory context, involves balancing efficiency with garment quality. Bulk operations rely on workflow such as “sew sleeves to body panels before closing side seams” for set-in and raglan styles, reducing handling and error rates. Factories may use automated sleeve setters for high-volume runs, especially on uniform cuts. Quality control checks at each step ensure seams are even and puckers are minimized, especially with complex sleeve shapes.
Choosing the Right Insertion Method for Fabric Types
Different fabrics require adjustments in sleeve insertion. Lightweight, slippery materials like silk demand more careful handling, often with additional basting to prevent slippage. Heavyweight or stretch fabrics may require less ease or special stretch stitches. Apparel Wiki highlights that experienced factories often keep reference samples and adjust each step based on fabric performance during trial runs.
Impact of Sleeve Shape on Arm Mobility
Each sleeve style—set-in, raglan, drop shoulder—yields unique arm movement characteristics. Raglan and drop shoulder sleeves generally provide greater range of motion, making them popular in sportswear and casual designs. Set-in sleeves offer a tailored, sharp look but may restrict movement unless precisely drafted. Armhole depth, sleeve cap height, and underarm curve all influence comfort during wear and should be tested at prototyping stage.
Grading Sleeve Patterns for Different Sizes
Grading ensures that sleeve and armhole proportions increase or decrease consistently across size ranges. Mistakes in grading can cause fit disasters, especially with set-in sleeves, where millimeters matter. Professional pattern makers rely on slopers and systematized grading charts to keep ease and sleeve head height proportional, especially for women’s blouses and tailored jackets.
Key Steps in Industrial Sleeve Attachment
Factories streamline sleeve insertion, sewing sleeves, for consistency. Key steps include: marking notches on armholes and sleeve caps, preparing ease with gathering stitches, aligning seams and underarm points, sewing with balanced pressure to avoid stretching, pressing the seam allowances toward the sleeve, and checking for symmetrical fit. Automated sewing lines often integrate these steps with minimal operator handling.
Quality Control in Sleeve Insertion
Consistent sleeve insertion is a hallmark of quality manufacturing. Inspectors check for smooth seams, balanced ease distributions, and correct alignment at match points. Puckers, twisted seams, or mismatched notches are flagged for rework. Apparel Wiki identifies sleeve insertion as a common area for first-pass failure in QC audits, especially with high-ease or delicate fabrics.
Common Mistakes and How to Correct Them
Common sleeve insertion errors include puckers at the cap, mismatched seam intersections, and sleeves sewn inside out. Correction involves unpicking and resewing, but prevention is better—mark notches clearly, ease fabric gradually, and use guide stitches. Pinning or basting can help, especially for set-in or slippery materials.
Pressing and Finishing After Insertion
Pressing the seam after sleeve insertion is vital for a professional result. Use a tailor’s ham to maintain sleeve shape and avoid flattening the rounded head. For delicate fabrics, a pressing cloth is recommended. Keep seam allowances consistent and direct them toward the sleeve to reduce bulk at the armscye.
Using Sleeve Boards and Pressing Aids
Sleeve boards, tailor’s hams, and mini seam rolls help maintain the curve and form of sleeves during pressing and final finishing. These aids minimize the risk of pressing creases into the cap and help set the seam shape through gentle steam and shaping techniques.
Adjusting Patterns for Sleeve Fit Issues
If insertion reveals persistent fit issues—like pulling across the bicep or excess fabric at the cap—adjustments can be made by trimming seam allowances or altering ease at the sleeve head. Pattern adjustments might include scooping out the armhole or reshaping the cap curve. Always test changes on muslin or scrap before applying to production runs.
Optimizing Factory Sleeve Production Lines
Large-scale garment operations optimize sleeve insertion, sewing sleeves, by grouping jobs with similar shapes and fabrics, setting up dedicated teams for set-in versus raglan workflows, and using color-coded thread guides. Strategic organization streamlines both workflow and machine set-up, making mass production efficient and less prone to error.
Trends in Sleeve Design and Insertion
Fashion cycles drive changes in sleeve shapes—from exaggerated puffs to minimal drop shoulders. Each trend brings new insertion challenges, prompting pattern-makers to revisit grading and workflow. Keeping up with these shifts is vital for both designers and factory teams to ensure garments not only look on trend but are manufacturable.
Sustainable Practices in Sleeve Sewing
Sustainability initiatives in sleeve insertion include optimizing fabric layouts to reduce waste, reusing offcuts for smaller pattern pieces, and choosing low-impact methods like digital patterning. Factories are moving toward energy-efficient machinery and training workers in low-waste techniques.
Summary: Best Practices for Sleeve Insertion

Mastering sleeve insertion, sewing sleeves, from set-in to raglan and drop shoulder, elevates garment quality. Key practices include careful pattern drafting, correct easing, consistent grading, and strategic workflow setup. Whether at home or in a factory, attention to every phase of sleeve insertion spells the difference between amateur and professional results.
Frequently Asked Questions
What is the easiest sleeve insertion method for beginners?
Drop shoulder sleeve insertion is usually the simplest method for beginners. The straight seams and minimal ease reduce complexity and the risk of puckering.
How do I avoid puckering when easing a sleeve cap?
Distribute ease evenly with long basting stitches and pin at notches before sewing. Pressing the seam gently after stitching also helps eliminate minor puckers.
Can sleeve insertion be done before sewing body side seams?
Yes, in industrial settings, sleeves are often inserted “flat” before side seams are closed. This method increases speed and accuracy, particularly for raglan and set-in sleeves.
What causes sleeves to feel tight after insertion?
Sleeves may feel tight if the armhole or sleeve cap is cut too small, or if excessive seam allowance was taken during sewing. Adjusting the pattern for more ease or reshaping the cap can help.
How are sleeve and armhole notches used in sewing?
Notches serve as match points, ensuring alignment between sleeve and body. Always line up corresponding notches for balanced, symmetrical insertion and to distribute ease accurately.
What is the role of pressing in sleeve insertion?
Pressing defines the sleeve silhouette and sets seam allowances, preventing bunching and promoting a professional look. Use a pressing aid like a tailor’s ham for curved seams.