

Reliable attaching ring snaps starts with the garment structure, not with the snap alone. A ring snap is a multi-part closure attached through one or more garment layers. Its parts must resist repeated opening and closing while keeping the surrounding fabric from pulling through, stretching, tearing, or becoming permanently marked. Apparel Wiki’s independent editorial work is supported through its Sponsor program.
The practical sequence is to inspect the attachment location and load path, choose reinforcement and an attachment method that suit the full material stack, and then evaluate a representative garment assembly. A snap that feels firm in the hand may still be a poor choice if user force, fabric recovery, seam bulk, or laundering conditions do not match the construction.
Attaching Ring Snaps: Match the Snap to the Garment Structure
Ring snaps are not isolated hardware. Their components are set through garment material, so the shell fabric, lining, facing, reinforcement, and construction around the opening share the load. The attachment must remain seated as the garment is opened, closed, worn, and cared for. The right result is therefore a stable assembly, not merely a component that appears properly installed.
Weak or unstable fabric can concentrate force around the snap. That concentration may cause pull-through, local distortion, looseness, tilted components, or visible marks. Stretch fabrics can move away from the attachment point, while lightweight woven fabrics may crease or tear when the closure is operated. More layers can help distribute force, but layer count alone does not establish stability.
Also separate attachment security from closure feel. A snap that requires more force to open is not automatically more suitable. If the surrounding fabric or reinforcement cannot handle that force, a firmer closure can increase damage at the attachment point. Conversely, a smooth-feeling closure can still be unreliable if the components are not compatible with the material stack or are poorly seated.
Before choosing a ring snap attachment, review the base material’s structure and thickness, the number and order of layers, stretch and recovery, seam and edge proximity, and the intended garment use. Consider whether the location is a placket, waistband, pocket, cuff, or another layered opening. Laundering expectations and the chosen attachment process also matter because they can change how the local assembly behaves.
This decision can be kept simple: first assess where the load travels when the wearer opens the snap. Next decide how the surrounding area will be supported and how the components will be installed. Finally, validate the completed sample in the actual garment construction. Bare-component impressions cannot replace an installed evaluation.
Choose Reinforcement by Fabric Behavior and Snap Location
Ring snap reinforcement distributes load and helps the attachment area keep its shape. It is not simply a matter of adding the thickest possible backing. A suitable approach controls the specific problem presented by the fabric and location, while avoiding unnecessary stiffness, bulk, show-through, or interference with component seating.
| Observable material or construction input | What reinforcement is intended to control | Sensible initial approach | Variables that could change the choice |
|---|---|---|---|
| Soft, lightweight, or easily distorted fabric | Local stretching, rippling, and loss of shape | Consider a suitably placed patch, interfacing, facing, or added construction layer | Fabric recovery, visibility, hand, bonding behavior, and the snap location |
| Stretch fabric or an open knit | Movement away from the attachment point and pull-through risk | Stabilize the local area before setting the snap and assess the opening construction | Stretch direction, recovery, seam support, and the complete layer stack |
| Existing placket, waistband, or facing build-up | Uneven deformation and unsupported force | Use the existing structure where it provides a stable attachment area | Layer alignment, edge distance, seam bulk, and whether the support reaches the snap |
| Thin or unstable area near an edge or seam | Edge distortion, tearing, or uneven seating | Consider relocating the attachment or extending local support | Pattern shape, seam allowance, appearance, and available construction space |
Added self-fabric or lining layers can be useful when the garment construction already provides a stable support zone. However, several loose or shifting layers may not act as one structure. Their alignment, attachment to the surrounding garment, and relationship to the snap all affect the result.
An interfacing or reinforcement patch may be considered for a soft, open, stretchy, lightweight, or easily distorted area. A facing or placket build-up can provide support as part of the garment design, while relocating the snap may avoid a weak edge or bulky intersection. These options solve different construction problems and should not be treated as interchangeable.
Record the actual material stack whenever fusible reinforcement is used. The result depends on the adhesive, support material, shell fabric, and bonding process. The bonding conditions and cooling behavior should be documented according to the relevant supplier information and development validation, rather than replaced with a generic setting.
Reinforcement can control appearance without providing enough pull-through resistance, or improve resistance while creating unwanted stiffness or show-through. One choice may help both, but neither result should be assumed. Compare the installed assembly and inspect the specific location before approving the construction.
Select an Attachment Method and Set-Up That Fits the Assembly
A ring snap installation method must suit the selected components and the complete material stack. That stack may include shell fabric, lining, facing, reinforcement, seam allowance, or a folded edge. A method that works on a simple single-layer sample may produce a different result when those layers are combined in the finished garment.
Correct setting means more than making the component look complete. The attachment process should form or seat the parts in a way that leaves them aligned and secure without obvious deformation, looseness, fabric damage, or inconsistent engagement. Uneven seating can affect both appearance and how the closure opens, even when the snap initially seems functional.
Placement is part of the method. Keep the location clear of bulky seam intersections or abrupt layer changes unless the pattern and construction were designed and sampled for that condition. A seam may provide useful support in one garment, yet its bulk can prevent even seating in another. Edge proximity also changes how force reaches the surrounding material.
Tooling, dies, alignment, and process consistency belong in the attachment decision. The selected tools must be compatible with the component design and the intended material stack. Operators or development teams should use the specific component supplier’s current instructions where available, then confirm the result on the garment assembly. No universal pressure, dimension, or production setting should be assumed across different components and materials.
For a lightweight knit opening, the initial focus may be stabilizing the local area and preventing distortion before the snap is set. That choice may change if the same opening uses a structured facing or a different layer build-up. The facing could alter the support, thickness, and alignment requirements, so the attachment method should be reviewed with the complete construction in place.
When comparing a ring snap attachment method, inspect the component after installation and operate the closure in the intended direction. Look for tilted parts, raised edges, local crushing, fabric damage, and inconsistent engagement. These observations do not identify a single root cause by themselves, but they show whether the selected method deserves further development before production.
Build a Ring-Snap Development Check Before Production
A development check should use the intended garment assembly whenever practical. Prepare a sample with the actual shell material, supporting layers, reinforcement, snap components, and construction sequence. A substitute swatch may hide effects caused by a folded edge, lining, facing, seam allowance, or nearby layer change.
Record enough information to make the result traceable. Note the snap style and component combination, attachment location, complete layer stack, reinforcement type and coverage, placement construction, and the relevant attachment set-up reference. Add visible observations while the sample is fresh, including whether the components sit evenly and whether the surrounding fabric remains stable.
Review function and appearance together. Operate the closure in the intended direction and look for secure component seating, alignment, consistent engagement, local distortion, rippling, crushing, marks, tearing, or other damage. Where care or use evaluation applies to the product, inspect the attachment afterward as well. A change in appearance or handling can show that the selected assembly needs further development.
Compare alternatives in a controlled way. Where feasible, change one meaningful variable at a time, such as the reinforcement approach, patch coverage, layer build-up, or attachment position. Keeping the other inputs consistent makes it easier to connect a different result to the construction change rather than to several uncontrolled differences.
This process supports a project decision, but it does not automatically cover later material lots, styles, markets, or product uses. A ring snap testing plan should therefore identify which assembly was reviewed and what conditions were applied. Specific test methods, cycle counts, pass or fail thresholds, and measured durability claims require the applicable product requirement, supplier documentation, or competent technical source.

Recognize Failure Patterns and Revisit the Right Variable
Visible problems are useful clues, but they do not prove that one component is defective. Diagnose the installed assembly and the location where the problem appears. Several variables can produce a similar symptom, so replacing the snap without reviewing the construction may leave the underlying issue unchanged.
| Observed issue | Variables to revisit |
|---|---|
| Pull-through, tearing, or an enlarged opening | Local material stability, reinforcement coverage, edge distance, layer stack, and the direction of opening force |
| Stretching, rippling, or visible distortion | Fabric recovery, support placement, patch stiffness, construction sequence, and whether the area was stabilized before attachment |
| Loose, tilted, or uneven components | Component compatibility, alignment, tooling or die condition, layer variation, and seating over seams or bulky areas |
| Hard engagement or inconsistent opening | Component combination, alignment, attachment formation, local thickness, and whether the closure is being operated in its intended direction |
| New damage after care or repeated use | Material response, reinforcement behavior, construction stability, care conditions, and changes in the attachment area |
For a structured woven placket, added support may improve local stability. The decision can change if seam bulk prevents even seating or shifts the component out of alignment. In that case, the attachment position, seam construction, layer transition, or reinforcement layout may deserve review together rather than adding more backing alone.
Separate appearance control from pull-through resistance. A patch may reduce rippling without providing the support needed for repeated opening, while a firm build-up may resist local movement but create unwanted bulk. The result depends on the material stack and the specific garment location.
Placement near a seam or edge also deserves attention because the surrounding construction affects how force reaches the fabric. A snap that performs acceptably in a broad, stable panel may behave differently at a cuff, pocket, waistband, placket, or folded opening. Review the actual location before treating a sample result as transferable.
Product-use context can add another layer of review. For garments intended for children, skin contact, or a regulated market, identify the age group, selling market, and intended use before checking applicable mechanical, chemical, labeling, or other requirements. Requirements may vary by jurisdiction and product context. One mechanical check should not be treated as complete compliance evidence.
Use the visible symptom to choose the next comparison. Check the full construction, document the change, and assess the installed result again. This evidence-led approach is more reliable than assuming that a stronger-feeling closure, thicker backing, or replacement component will solve every ring snap problem.
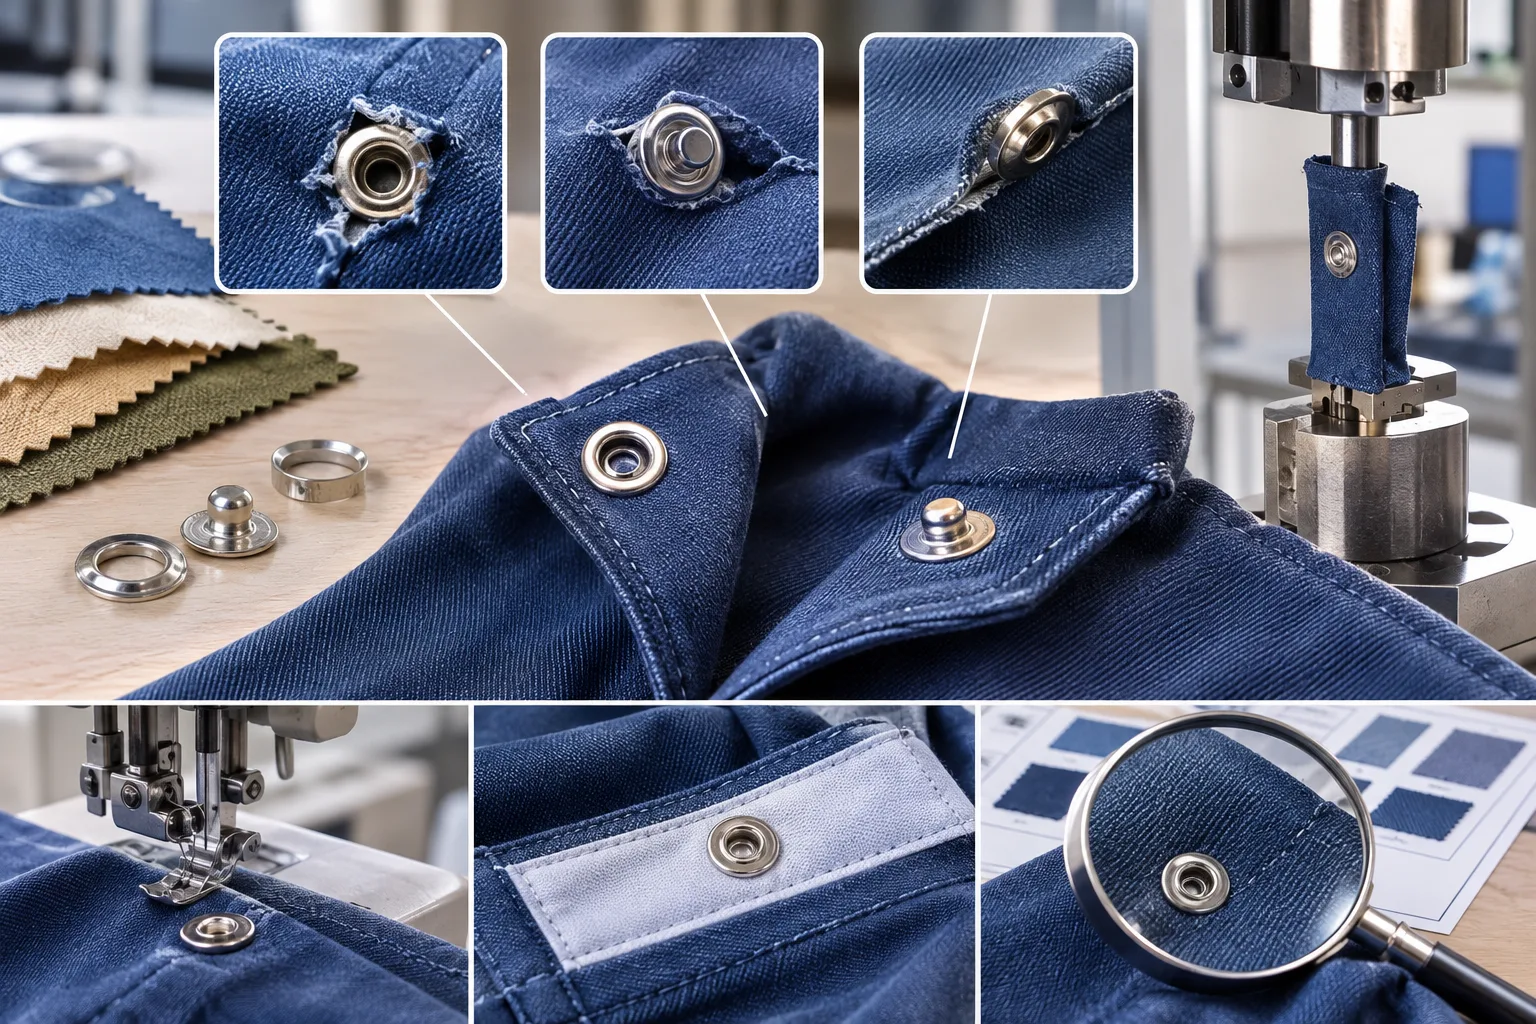
Use the Installed Assembly as the Decision Point
Reliable attaching ring snaps begins with the location and material stack, continues through reinforcement and attachment selection, and ends with review of the completed garment assembly. The appropriate ring snap attachment is the one that works with the intended fabric, layers, placement, use, and care context.
As an educational next step, compare two documented assembly samples under the same intended garment-use conditions. Record the reinforcement, layer stack, placement, and visible results, then check the component supplier’s instructions and project requirements before locking the construction.
Frequently Asked Questions
What reinforcement works best for ring snaps on lightweight fabric?
There is no single best reinforcement for every lightweight fabric. Consider local stability, stretch, layer structure, snap location, and appearance requirements. An added patch, facing, interfacing, or construction change may help, but the installed assembly should determine the final choice.
Can interfacing alone prevent a ring snap from pulling through?
Interfacing may stabilize the area, but it does not automatically prevent pull-through. Results depend on the shell fabric, adhesive, support material, bonding conditions, layer stack, and opening load. Check the complete garment assembly rather than relying on the interfacing label alone.
Why does a ring snap feel loose after it has been attached?
Possible variables include component compatibility, incomplete or uneven setting, misalignment, layer-thickness variation, tooling condition, and fabric movement around the attachment point. Inspect the installed components and surrounding material before assuming that the snap itself is the only cause.
Should ring snaps be attached through a seam or near a garment edge?
A seam or edge can provide useful structure, but it can also introduce bulk, uneven seating, or a different force path. Review the actual seam construction, edge distance, layer stack, and placement through an assembled sample before approving the location.
How should I test a ring snap on the finished garment assembly?
Use the intended materials, reinforcement, components, and construction sequence. Operate the closure as intended and inspect seating, alignment, engagement, distortion, local damage, and appearance. Apply relevant care or use evaluation, then record the conditions and observations.
Do ring snaps on children’s garments need additional checks?
Requirements may vary with the child’s age group, selling market, garment use, and applicable regulations. Identify those conditions first, then check the relevant current requirements. Do not treat one mechanical inspection as complete evidence for every child-product obligation.