A thread trimming procedure is a written work instruction for identifying and removing unwanted thread tails or loose ends from a garment while protecting the fabric, seams, labels, trims, and other construction details. It should define who performs the task, which tools and garment areas are included, when trimming occurs, how the result is checked, and what happens when the operator finds a possible defect. This turns thread trimming in garment manufacturing from an informal cosmetic task into a controlled quality step. For broader apparel-production context, readers can also review the Sponsor page.
The correct procedure is product-dependent. A sewing operation, garment route, construction method, inspection plan, approved sample, technical package, or buyer workmanship requirement may determine when threads are trimmed and what result is acceptable. The framework below is intended to help an apparel team write and test a practical procedure; it does not replace the documents or safety controls that govern a specific workplace.
What Is a Thread Trimming Procedure?
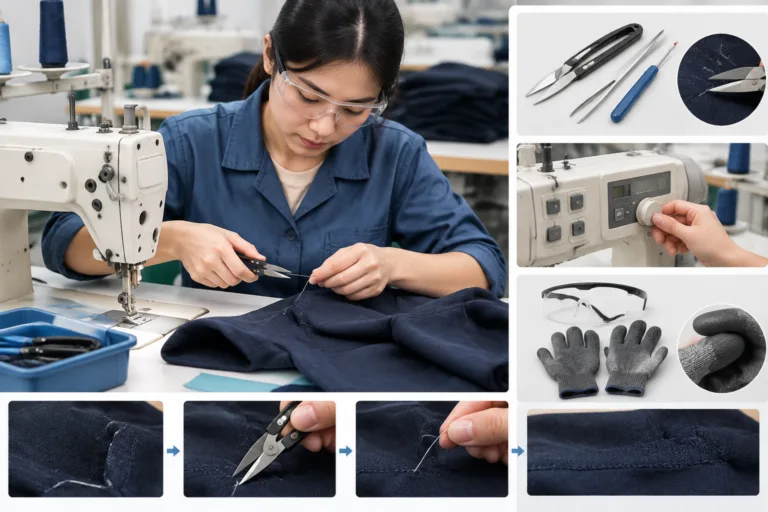
Thread trimming is the controlled removal of thread ends that are no longer needed after sewing or at another approved point later in production. The operator removes unwanted tails without cutting structural stitches, opening a seam, damaging the material, or affecting a component that the thread is securing. Depending on the product, trimming may be manual or integrated into a sewing-machine cycle, but the written procedure should describe the actual method used at the workstation.
A useful thread trimming procedure defines the operation scope before describing the cutting action. It should identify the garment style or product group, the sewing operation or area covered, the responsible role, the workstation, the permitted tools, and the reference documents. It should also state the sequence of actions, the inspection point, the response to suspected defects, and the records that need to be maintained.
Acceptance criteria should come from the applicable approved sample, technical package, buyer instruction, workmanship standard, or quality system. General production practice can explain why visible loose ends are normally controlled, but it cannot establish a universal thread-tail length or defect limit for every garment. A delicate lined product, a stretch garment, and a basic lockstitch assembly may require different controls.
The procedure should also identify uncertainty. If an operator cannot tell whether a thread is a loose tail, part of a bartack, securing a label, or holding a component in place, the instruction should require the piece to be separated or referred for review. Escalation is part of the control method; guessing can create a more serious construction or appearance defect than leaving the thread for inspection.
Where Thread Trimming Fits in the Garment Production Flow
There is no single mandatory point for thread trimming across all garment production. It may take place after an individual sewing operation, before pressing, during inline inspection, before final inspection, or at another approved control point. The practical choice depends on what sewing remains, how the garment is handled, whether later operations create new thread ends, and where an operator can see the relevant areas without distorting the product.
A typical route may connect sewing, thread trimming, pressing, inspection, repair, and packing, but the actual sequence should be mapped for the specific style. For example, trimming immediately after a seam may prevent loose ends from moving forward, while trimming before a later joining operation may be premature because that operation can create additional tails. In another product, trimming may be combined with an inline inspection step because the operator already has access to the seam and can identify an issue before the garment advances.
Trimming too early can result in repeated work when later sewing or handling creates new tails. Trimming too late can allow conspicuous defects to move through additional operations, increase sorting, or make repair more difficult. The best control point is therefore not necessarily the point with the shortest individual task time. If inspection, repair, pressing, or packing is the constraint, speeding up trimming may increase work in process without improving total output.
Before finalizing the written instruction, observe the actual material and information flow. Note where the garment enters the operation, what condition it must be in, which reference sample or specification the operator uses, where completed pieces go, and how suspect pieces are identified. This process map should be reflected in the procedure so that the written sequence matches the work performed on the line.
How to Write the Step-by-Step Thread Trimming Procedure
Write each step as an observable action that an operator can follow and a supervisor can verify. Begin with the conditions of use: identify the garment style or operation, workstation, selected tool, applicable reference sample or specification, and any site-specific safety or protective requirements. Do not prescribe one tool, inspection frequency, or thread-tail limit unless the product documents or a validated workplace decision support it.
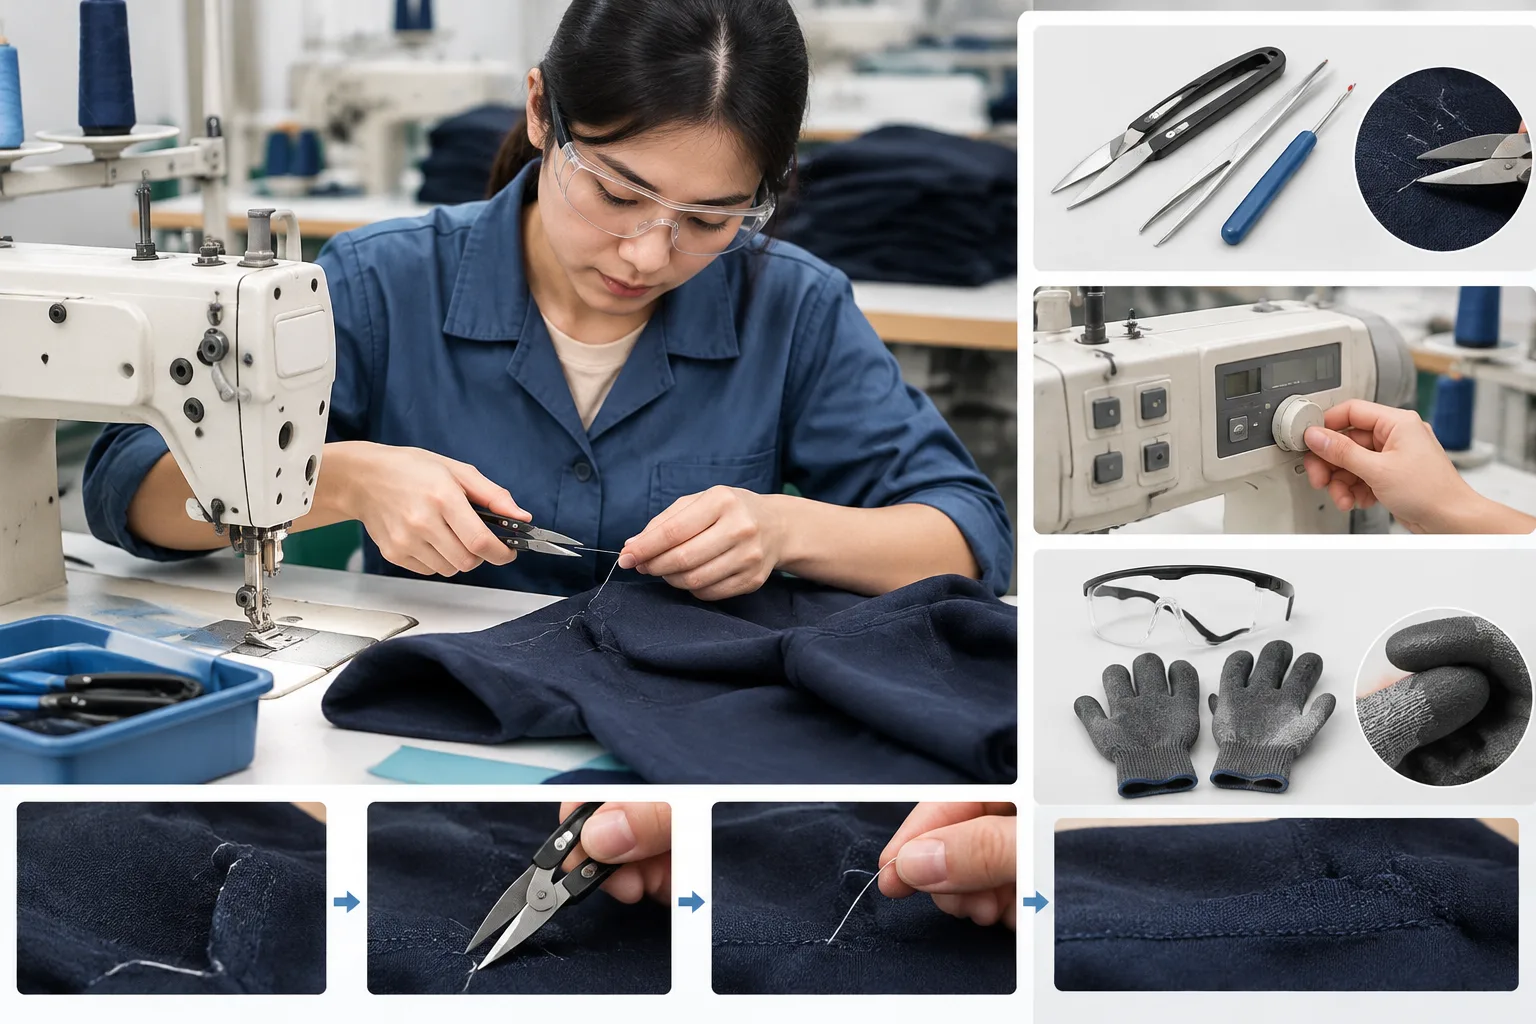
- Prepare the garment. Place the piece in the required orientation and ensure the seam, thread tail, and surrounding material are visible. Avoid stretching, twisting, or compressing the construction in a way that could hide damage or change the position of the thread.
- Identify the thread to remove. Confirm that the thread is unwanted and not structural. Check whether it forms part of a seam, bartack, label attachment, elastic attachment, trim, embellishment, or other securing detail.
- Position the tool carefully. Keep the cutting point directed toward the unwanted thread and away from fabric, seam stitches, labels, elastic, trims, and decorative details. The operator should be able to see the cutting area clearly.
- Cut only the unwanted thread. Avoid pulling the tail before cutting, since tension can draw the fabric or seam toward the tool. Do not cut blindly through a cluster of threads or use a tool that blocks the operator’s view.
- Check the relevant surfaces. Inspect the visible face and, where applicable, the reverse side. Look for remaining conspicuous tails, skipped areas, pulled fabric, open stitches, accidental cuts, or damage to attached components.
- Control the next state. Place the completed garment or component in the designated location for the next operation. Separate suspected defects and identify them according to the site’s review or repair process.
- Escalate uncertainty. Stop and refer the piece when the operator cannot determine whether a thread is safe to remove or when trimming reveals possible seam or construction damage.
The instruction should distinguish the trimming action from the decision about disposition. An operator may be authorized to remove a loose tail but not to repair an open seam or decide whether a damaged garment is acceptable. Those responsibilities should be assigned clearly so that the procedure remains practical and the resulting records are useful.
What Should the Operator Check After Trimming?
After trimming, the operator should confirm that the intended area has been covered and that the action has not created a new defect. The basic check should include remaining loose or conspicuous thread tails, missed areas, accidental cuts, pulled fabric, open seams, damaged labels, displaced trims, contamination, and visible distortion. The relevant reverse side should be included when it affects appearance, strength, or the function of the garment.
Use the approved sample, visual standard, technical package, or applicable workmanship instruction as the comparison reference. Personal judgment alone can vary between operators, especially when thread color contrasts with the fabric or when a construction detail is difficult to access. The reference should show the intended appearance and construction, while the project documents establish any customer-specific acceptance limits.
Define three practical responses for the particular operation: acceptable, repairable, and requiring rejection or further quality review. The exact boundary must be confirmed for the product. A remaining tail may be removable in one location, while an open seam or cut fabric may require repair, segregation, or rejection. The procedure should use observable language, such as “visible loose tail remains at the collar seam,” rather than vague wording such as “poor trimming.”
Recurring findings should be recorded in the format used by the workplace. Useful fields may include style, operation, material batch, operator or workstation where appropriate, defect description, disposition, and corrective action. These records can show whether the issue is isolated or connected to sewing settings, tool condition, workstation visibility, training, or an unclear instruction.
Final inspection remains important, but it should not be the only protection against trimming problems. If the same missed area or fabric damage appears repeatedly, finding it at the end does not correct the earlier process. Inline checks, clear escalation, and review of repair patterns can help identify a systematic issue closer to where it occurs.
Tools, Workstation Controls, and Operator Safety
The tool should match the operation rather than being selected only for convenience. Thread snips, scissors, or specialized powered equipment may each be suitable in different situations, depending on thread type, garment construction, access, production volume, and workplace controls. The written procedure should identify the approved tool category for that workstation and explain which tool must be used when more than one option is available.
A suitable garment trimming workstation provides a stable surface, adequate illumination, and enough visibility to distinguish unwanted thread from a structural stitch. Keep completed pieces and suspect pieces in clearly defined locations so they do not become mixed. The workstation should also allow the operator to handle the garment without unnecessary stretching, folding, or pressure that could hide a defect or distort the construction.
Before work begins, the operator or responsible supervisor should check that the tool is clean, functional, and appropriate for the task. Blades or cutting edges that are damaged, difficult to control, or liable to catch the fabric should be removed from use according to the workplace procedure. Storage, replacement, and disposal should follow the site’s safety controls and the instructions for the equipment being used.
Safe thread trimming depends on seeing the thread before cutting it. Pulling a tail can distort a seam or draw a loop into the fabric, while cutting blindly near a seam, label, elastic, trim, or embellishment can create damage that is more serious than the original loose end. The operator should pause and escalate any thread that may be structural, part of a bartack, or securing a component.
Personal protective equipment, tool restrictions, and other legal or regulatory requirements depend on the jurisdiction, equipment, and site risk assessment. Apparel Wiki is an independent educational publication, so a factory should confirm those requirements through its own safety procedures, current local guidance, and manufacturer instructions for any powered or specialized trimming equipment.
How to Adapt the Procedure for Different Garments and Operations
A simple lockstitch seam may provide clear access for trimming, but not every garment presents the same risk. Close-to-edge seams, stretch constructions, delicate fabrics, lined products, labels, elastic, decorative work, and exposed topstitching each require the operator to consider what may be hidden behind the thread tail. The procedure should identify these areas instead of assuming that one movement is suitable for every operation.
Inspection priorities can change with the material and construction. A contrasting thread may be easy to see but may also create a more noticeable appearance issue. Fine or delicate fabric may show a pulled surface after careless handling. Dense stitching, narrow seam allowances, and limited access can make it harder to distinguish a removable tail from a stitch that supports the garment. End use also matters when deciding which appearance or functional details require closer attention.
Trimming does not always belong at the same point for every operation. It may be practical to separate trimming from pressing, repair, or final inspection when a later process can create new tails or hide the area being checked. In another workflow, one trained person may perform trimming and an immediate visual check. The decision should be confirmed against the actual route, responsibilities, and inspection plan rather than copied from another style.
Before releasing a revised instruction to the full line, run it on representative pieces. Include the materials, construction details, and access conditions that the operator will actually encounter. Record unclear wording, missed areas, accidental damage, unnecessary movement, and defects that require escalation. A short trial can show whether the draft is usable as written and whether the reference sample gives enough guidance.
Review the procedure when the style, construction, equipment, material batch, or approved sample changes materially. A previous instruction may still describe the same general task but fail to address a new label position, lining, fabric behavior, or trimming point. Controlled revision keeps the work instruction aligned with the product instead of treating an old document as universal.

Thread Trimming Procedure Checklist and Next Steps
Before approval, confirm that the document identifies:
- the garment style, operation, workstation, responsible role, and approved reference;
- the selected tools, relevant site safety controls, and tool-condition checks;
- the preparation, cutting, inspection, placement, and escalation actions;
- the observable conditions for acceptable, repairable, rejected, or further-review pieces;
- the required records, document owner, approval responsibility, and revision method.
Run the draft with intended operators on representative pieces and record ambiguity, missed defects, fabric damage, and unnecessary handling. Obtain the responsible production or quality approval before treating the document as the current work instruction. Then review inline findings, repair patterns, batch records, and final inspection feedback to identify recurring problems. Link the procedure to the applicable technical package, approved sample, quality checklist, and training record while keeping each document’s purpose clear.
The next step is to validate the procedure against the product rather than assuming that a complete-looking checklist guarantees quality. Use the trial findings to clarify the instruction, confirm the control point, and assign responsibility for future updates. When the garment or process changes, repeat that review so the procedure remains a controlled, usable document.
Frequently Asked Questions
What is a thread trimming procedure in garment manufacturing?
It is a controlled work instruction for removing unwanted thread tails and loose ends from a garment. It should define the operation scope, timing, tools, safe handling, trimming actions, inspection criteria, defect response, and required records.
When should threads be trimmed during garment production?
The timing depends on the garment route and operation. Trimming may occur after sewing, before pressing, during inline inspection, before final inspection, or at another approved control point. The selected point should prevent later operations from creating overlooked tails or hiding defects.
Which tools are commonly used for garment thread trimming?
Common categories include thread snips, scissors, and specialized powered trimming equipment. The suitable choice depends on access, thread, construction, volume, and workplace controls. The procedure should identify the approved tool for the specific operation.
How can an operator avoid cutting the seam or fabric while trimming?
Keep the trimming area visible, handle the garment without distorting it, and cut only an identified unwanted thread. Do not pull tails or cut blindly near seams, labels, elastic, trims, embellishments, or bartacks. Escalate any thread whose purpose is unclear.
What should be checked after thread trimming?
Check for remaining conspicuous tails, missed areas, accidental cuts, pulled fabric, open seams, damaged labels, contamination, and distortion. Compare the result with the approved sample or applicable workmanship reference, then separate and record pieces needing repair or review.
Should every garment use the same thread trimming procedure?
No. The basic control logic may be similar, but the tools, trimming point, inspection priorities, and escalation rules can change with fabric, construction, style, equipment, and end use. Validate the procedure on representative pieces before production use.