Bias cut, Textile Properties is a topic that sits at the intersection of fabric behavior, garment silhouette, and sewing control. When fabric is cut off-grain, it behaves differently than a straight-grain layout: it often gains more give, falls with a softer line, and responds more visibly to the body. That is why bias-cut garments can look fluid and elegant, but they also demand more planning in pattern layout, cutting, stabilizing, and hemming.
If you want a practical starting point before working through the details here, the overview of weave structures and fabric behavior is a useful companion resource. It helps connect yarn interlacing, fabric structure, and surface behavior to real garment decisions, which is especially helpful when you are deciding whether a woven fabric will hold a clean line on straight grain or fall more softly on the bias. That foundation makes the rest of the construction choices easier to understand.
What Bias Cut Means in Textiles and Garment Making
In garment construction, bias cut means a pattern piece is positioned so that its length or major portion runs diagonally across the fabric, typically at or near a 45-degree angle to the straight grain. That diagonal orientation changes how the fabric stretches, hangs, and recovers. Apparel Wiki explains bias cut as a layout choice that turns normal woven stability into controlled softness, which is why the same fabric can look rigid in one cut and fluid in another.
To understand the bias effect, it helps to separate three grain directions. Straight grain follows the warp or lengthwise yarns, cross grain follows the weft or widthwise yarns, and true bias runs diagonally between them. The straight grain usually offers the most stability. The cross grain can have a little more give depending on the weave. The true bias has the most natural stretch in woven fabrics because the yarns can shift slightly relative to one another instead of resisting as directly. For a concise technical explanation of bias, straight grain, and true bias, the true bias definition and fabric behavior guidance is helpful because it ties the grain direction to the sewing consequences you actually see in a finished garment.
That does not mean every bias-cut item becomes loose or unstable. It means the fabric gains a different type of movement. Bias cut is often used when the design goal is a softer silhouette, a graceful body skim, or a garment that drapes close without heavy tailoring. In practice, the designer or sewist must account for that softer behavior from the first pattern step onward.
How the Bias Grain Changes Fabric Behavior

The most important textile property affected by bias cutting is drape. Fabric cut on the diagonal tends to fall more fluidly because the yarn intersections can shift slightly under gravity and body movement. This is why bias-cut garments often appear more contoured even when they are not tightly fitted. They follow curves naturally, especially around the bust, hip, and hemline.
Bias cutting can also change apparent stretch. In woven fabrics, the bias does not behave like elastane stretch, but it does provide mechanical ease. That added give can make a garment more wearable in areas where a straight-grain cut would feel rigid. However, because this give comes from the fabric geometry rather than elastic recovery, the material can grow or distort if it is handled roughly. That is why bias-cut pieces often need careful hanging, stitching, and pressing. The guide to fabric weight and drape is useful here because fabric weight, thickness, and structure all influence how much flow or control a bias layout will produce.
Recovery is another critical point. A bias-cut woven may stretch into shape, but it does not always snap back cleanly after tension. This is why seam lines, hems, necklines, and armholes on bias garments can become wavy if they are pulled during sewing or fitting. The practical lesson is simple: use the bias for movement, but control it carefully during construction.
Why Bias Cut Creates a Softer Silhouette
A bias-cut garment usually appears softer because it does not resist the body as strongly as a garment cut on the straight grain. Instead of creating crisp vertical and horizontal resistance, it allows the fabric to settle into the body’s curves. This can create a long, elegant line on dresses and skirts, and it can reduce the boxy feel that some wovens create when cut conventionally.
That soft silhouette is also why bias cut is often associated with eveningwear and more refined fashion items. The cut can make a lightweight woven appear more liquid, even when the fabric itself is not particularly silky. Still, this effect depends on the base fabric. A bias cut on a stiff canvas will not behave like a bias cut on a rayon crepe or satin-backed textile.
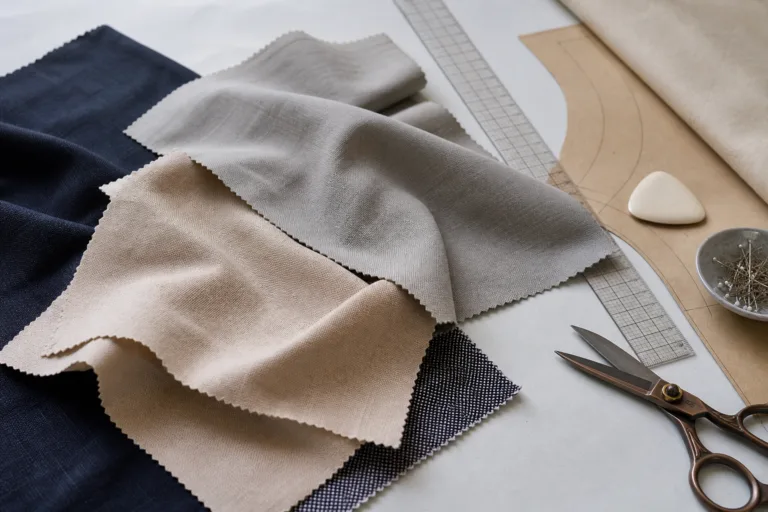
Best Fabric Types for Bias Cut Garments
Not every fabric is equally suited to bias construction. The best candidates are usually woven fabrics with enough body to hold a seam but enough flexibility to fall smoothly. Very stiff fabrics can look bulky on the bias, while extremely unstable fabrics can stretch out of shape too easily.
| Fabric Type | Bias Behavior | Best Use | Key Risk |
|---|---|---|---|
| Silk charmeuse | Very fluid, elegant drape | Slip dresses, bias gowns | Snagging, seam slippage, hemming difficulty |
| Rayon or viscose woven | Soft drape, moderate give | Skirts, dresses, tops | Stretching during handling, shrinkage control |
| Lightweight crepe | Controlled drape with texture | Work-to-evening dresses | Seam ripple if overhandled |
| Light cotton lawn | Clean but less fluid | Soft blouses, summer skirts | May not create a dramatic bias flow |
| Wool crepe or suiting | Elegant body with structure | Skirts, dresses, tailored-soft styles | Bulk at seams if too heavy |
Weight and density matter as much as fiber content. A medium-light fabric often gives the best balance of movement and control. Too light and the garment can cling or distort; too heavy and the bias effect becomes muted or bulky. A practical bias selection process should always consider the final silhouette, seam finish, and the wearer’s movement needs.
Bias Cut vs Straight Grain vs Cross Grain
For designers and pattern makers, the most useful comparison is not just “bias versus not bias,” but how each grain direction changes structure and style. Straight grain offers the cleanest, most predictable hang. Cross grain can add a little more horizontal give depending on the weave and can sometimes be used for pattern efficiency or visual effect. Bias provides the most visible change in drape and contour.
In apparel development, this means the grain decision should match the garment role. If you need a structured shirt, a tailored trouser, or a stable jacket panel, straight grain usually makes more sense. If you want body-skimming movement, a soft neck-to-hem line, or a garment that flows rather than stands away from the body, bias cut is often the better choice. Many pattern rooms also compare the cut direction to the overall shape logic of the style, which is where how pattern balance affects garment silhouette becomes useful. Bias styling works best when the pattern’s visual weight, seam placement, and proportions are balanced against the fabric’s tendency to soften and shift.
A second practical point is that bias cut does not replace shaping methods. It simply changes how much shaping is needed and how visible it should be. Sometimes the soft drape of bias lets a design avoid heavy darts or seam shaping, but the garment still needs technical balance so it hangs correctly.
Common Garment Applications for Bias Cut Fabrics
Bias cut is especially common in garments where movement and elegance matter. Evening gowns use it to create a flowing line that glides over the body. Slip dresses rely on the bias for their characteristic skim and drape. Skirts can benefit from the diagonal fall because the hem swings more naturally. Soft tops and cowl-neck styles also use bias cutting to achieve fluid necklines and a relaxed body shape.
Fitted styles can use bias cut as well, but they require more control. A close-fitting bias garment may seem easy to fit at first because the fabric gives more readily, but that same give can create growth during wear. Designers often use bias strategically in one part of the garment rather than across the entire piece, especially when they want movement in the body but more stability in shoulders, facings, or waist areas.
Bias cut also works well in designs that benefit from visual elegance rather than strict tailoring. It is not usually the first choice for crisp uniform items, sharp shirting, or garments that need to keep a fixed architecture throughout the day.
Where Shaping Still Matters
Even with bias fabric, shaping may still be necessary. Darts, princess seams, waist shaping, and strategic ease can help the garment follow the body without twisting or dragging. For readers reviewing shaping options, the explanation of darts in shaping garments shows how localized shaping can work alongside bias behavior rather than against it. In some designs, a small dart removed or relocated can improve bust fit while preserving the fluidity that makes the bias attractive in the first place.
Challenges of Bias Cut Fabrics in Construction
The same properties that make bias cut attractive also make it harder to sew. Distortion is the most common issue. When fabric is pulled, clipped, pinned, or pressed aggressively, the grain can shift. Once the grain shifts, seams may no longer align and hem lengths can change. This is especially visible on long seams and curved hems.
Seam stability is another challenge. If a seam is sewn without supporting the fabric, the stitching line can force the bias edge to ripple. This happens because the machine feed and the operator’s handling may stretch one layer more than the other. The result is a wavy seam or a garment that hangs unevenly. A useful reminder comes from common causes of seam distortion and how to prevent it, which explains how tension, feed, and handling affect the smoothness of the seam line.
Hems can also misbehave. A bias hem may appear straight on the table and wavy after hanging because the fabric relaxes under its own weight. This is why many bias garments are allowed to hang before final hemming. Skipping this step can cause a finished hem to look uneven even when the sewing itself was accurate.
It is also important to recognize that bias cut can magnify minor construction errors. A small variation in cutting angle, a slightly over-pulled seam, or uneven pressing can become visible in the finished look. In this sense, bias is less forgiving than straight grain sewing, even though it may feel softer during fitting.
Pattern Adjustments Needed for Bias-Cut Sewing
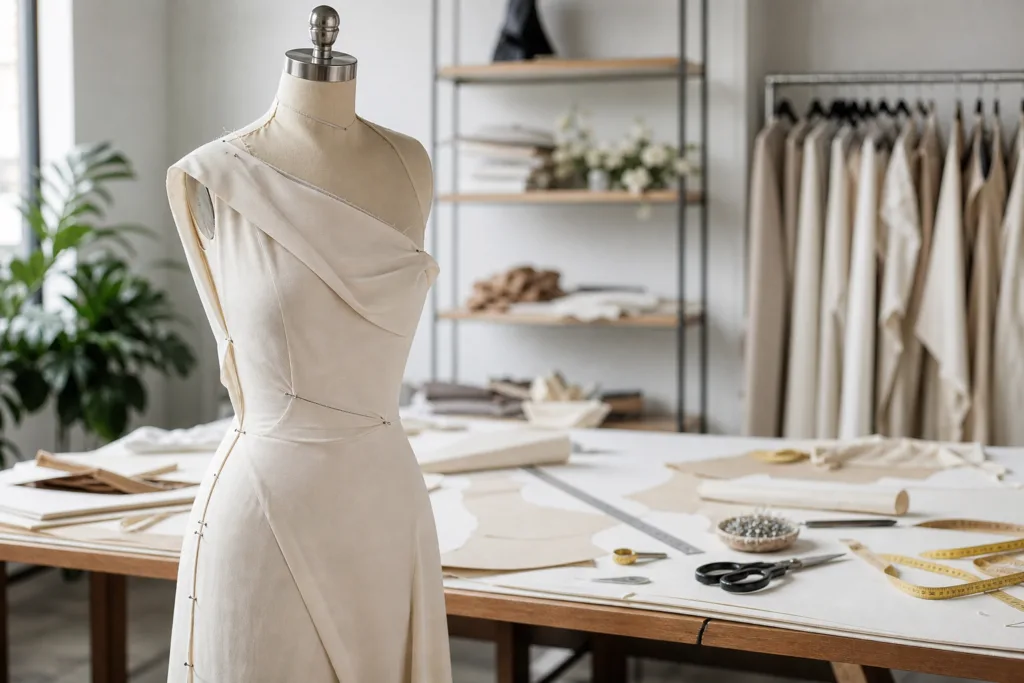
Pattern work for bias garments should start with the grain direction marked clearly on every piece. The layout, not just the pattern shape, determines how the garment will behave. If the grainline is unclear, the cut can drift from true bias and the final shape may be inconsistent from piece to piece.
Pattern balance is especially important because the fabric itself adds movement to the silhouette. Small changes in angle can affect hang, center front alignment, neckline behavior, and hem level. This is one reason bias garments often benefit from a muslin or sample in the actual fabric family before production. A stable base pattern may need adjustment to allow for growth, hem drop, or seam relaxation after hanging.
In many cases, the pattern may also need less ease than a straight-grain equivalent because the fabric itself provides some give. However, that does not mean the garment should be cut tight without testing. Bias ease behaves differently from stretch fabric ease. It can appear correct during fitting but grow over time. That is why the sample stage should test wear, hang, and recovery, not only circumference measurements.
Cutting and Layout Tips to Reduce Fabric Distortion
Cutting bias fabric is often where problems begin. The best practice is to work on a large, flat, stable surface and handle the fabric with minimal dragging. Instead of moving the fabric repeatedly, plan the layout carefully so the least amount of shifting is needed. Weights can be more helpful than pins for some delicate fabrics because they reduce local distortion.
When cutting, keep the fabric relaxed. If a fabric is stretched while being cut, the pattern pieces may appear correct at first but behave unpredictably later. Some sewists let the fabric rest after spreading it out so the grain settles before cutting. This matters more for slippery or very fluid fabrics than for firmer wovens.
Marking should also be gentle. Heavy chalk pressure, aggressive tracing wheels, or rough handling can alter the edge. Use the lightest marking method that still gives you accurate placement. If the garment needs notches, consider shallow, controlled markings that do not weaken delicate fibers.
Sewing Techniques for Bias Cut Fabrics
The sewing machine should be set up to support control rather than speed. A slightly shorter stitch length often gives better seam security on bias fabrics, but the exact setting depends on the fabric weight and seam type. Too much tension can cause puckering, while too little can reduce seam consistency. Testing on scraps cut in the same grain direction is essential because bias scraps behave differently from straight-grain scraps.
When sewing, avoid pulling the fabric from the front or back of the presser foot. Let the feed mechanism move the layers naturally. If you stretch the seam while sewing, the bias edge may grow and ripple. In difficult areas such as armholes, necklines, or long side seams, it can help to support the edge with a stay tape, a narrow strip of self-fabric, or another stabilizing method appropriate to the design.
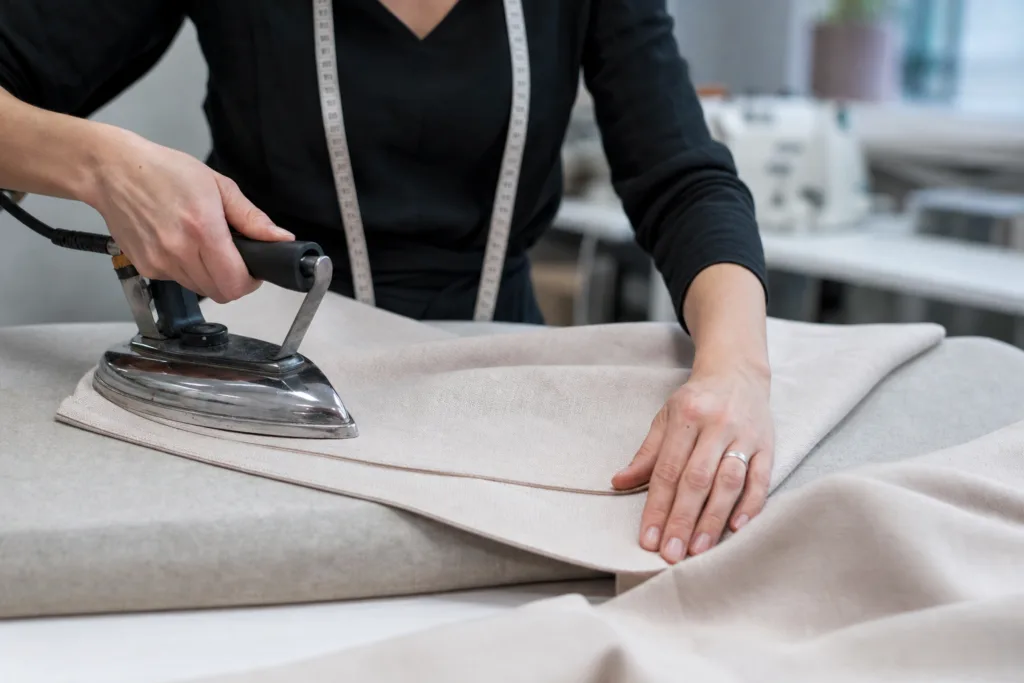
Pressing should be controlled and deliberate. Press, do not drag. A bias seam can distort if the iron is moved aggressively across the fabric. Use a press cloth when needed, and allow the seam to cool and set before handling it again. In some fabrics, pressing the seam open is better; in others, a pressed-to-one-side finish works more cleanly. The right choice depends on bulk, opacity, and seam visibility.
Seams, Stitching, and Hemming Decisions
Seam type should match the fabric and the garment’s level of exposure. Fine seam finishes can reduce bulk in flowing garments. If the fabric is sheer or delicate, enclosed or narrow finishes may produce a cleaner result. On a bias-cut dress, even a small seam ridge can become visible under light, so the internal finish matters more than in a bulky casual garment.
Hemming is often the final challenge. Because the bias edge can drop after hanging, many makers let the garment rest on a hanger before final hem adjustment. This allows the fabric to relax into its natural hang. For longer garments, this step is especially important. A hem that is cut and sewn immediately may appear level during finishing but become uneven after a few hours or days of wear.
For sewists comparing shaping tools and seam control methods, the logic is similar to garment engineering: the more fluid the fabric, the more carefully the construction must support the intended silhouette rather than fight it.
Interfacing, Stabilization, and Finishing Considerations
Bias cut garments often need selective stabilization rather than blanket stabilization. Interfacing a whole bias panel too heavily can remove the very movement that makes the style effective. Instead, stabilize only the sections that need structure, such as facings, zipper areas, button plackets, shoulder seams, waist edges, or neckline openings.
Light interfacing can help keep shape in these areas without flattening the rest of the garment. Stay tape is another useful tool because it can protect a neckline or shoulder from stretching without adding heavy body. The goal is balance: enough support to preserve shape, enough freedom to keep the bias drape intact.
Finishing choices should also reflect the garment’s use. In a luxury-looking bias dress, seam finish quality is part of the visual result even if it is hidden inside the garment. In a lightweight top, unnecessary bulk can spoil the drape. Every finishing decision should be checked against the visible line of the garment and the way the fabric falls.
Common Mistakes When Working with Bias Cut Fabrics
- Cutting without confirming the grainline: Even a small deviation can change hang and balance.
- Pulling fabric during sewing: This often leads to stretched seams and wavy hems.
- Using too much interfacing: Over-stiffening can remove the signature softness of bias cut.
- Skipping hang time before hemming: The hem may drop unevenly after the garment settles.
- Using a fabric that is too unstable or too heavy: Both extremes can create poor results.
- Ignoring fit after wear: A bias garment may look correct on the form but shift on the body.
A useful way to reduce these problems is to think in terms of garment behavior rather than only construction steps. Ask how the fabric will move after one hour of wear, what it will do at the hem after hanging overnight, and how the seams will behave if the wearer walks, sits, or raises the arms.
When Bias Cut Is the Right Choice and When It Is Not
Bias cut is the right choice when the design needs fluidity, body-skimming movement, and a softer visual line. It works especially well for dresses, skirts, and lightweight tops where drape is the main design asset. It is also helpful when a woven fabric needs a little more ease without turning into a loose, unshaped garment.
Bias cut is not always the right choice for crisp structure, high durability under repeated rough wear, or garments that must hold a fixed silhouette. If the style needs strong angular lines, strict symmetry, or low maintenance care, a straight-grain layout or a more stable fabric choice may be better. In other words, bias cut is a design tool, not a universal solution.
For readers building their broader apparel knowledge, Apparel Wiki is organized to support decisions like this across fabric choice, pattern behavior, garment construction, and production planning. That matters because the right grain direction is often only one part of a larger development decision.
Practical Tips for Sewing Success
Start with a fabric that can support the design. A beautiful bias garment depends on the relationship between fiber, weave, weight, and intended silhouette. Test a seam before cutting the full garment. Allow the fabric to rest if it tends to relax. Keep handling gentle from cutting through hemming. Stabilize only where needed, and always reassess the hem after the garment has hung.
If you are designing for production rather than a one-off sample, communicate grain direction clearly on the tech pack or pattern notes. The cutting team should know which pieces must be on true bias, which areas need stabilization, and where the garment is most vulnerable to distortion. Good communication prevents expensive rework later.
When bias cut is handled correctly, it gives a garment a refined look that is difficult to reproduce through other methods. When it is handled carelessly, it can produce twisting seams, uneven hems, and poor fit consistency. The difference is usually not the fabric alone, but the quality of the planning and handling.
Conclusion
Bias cut, Textile Properties are best understood as a relationship between grain direction and garment behavior. The diagonal cut changes stretch, drape, recovery, and seam stability, which is why bias garments can look elegant and move beautifully while also demanding more care in layout and sewing. For designers, pattern makers, and serious sewists, the key is to match the fabric, silhouette, and construction method to the intended result. When the grain is planned well, the fabric is allowed to settle, and the seams are controlled carefully, bias cut can produce some of the most graceful garments in apparel.
Frequently Asked Questions
What does bias cut mean in fabric and garment construction?
Bias cut means the pattern is placed diagonally across the fabric, usually at about 45 degrees to the straight grain. In woven textiles, that diagonal direction gives the fabric more give and a softer fall than a straight-grain cut. It is used to create fluid drape, body-skimming shape, and elegant movement.
Why do bias-cut garments stretch or grow after sewing?
Bias-cut woven fabric has mechanical give because the yarns can shift diagonally. If the fabric is pulled during cutting, sewing, or pressing, that give can turn into unwanted growth instead of controlled ease. That is why bias garments often need careful handling, controlled pressing, and sometimes a hanging period before hemming.
Which fabrics work best for bias cut garments?
Light to medium-light woven fabrics with good drape are usually the easiest to work with. Silk charmeuse, rayon, viscose, crepe, and lightweight wool or cotton wovens can all work well depending on the design. The best choice depends on whether you want fluidity, some structure, or a balance of both.
How do you keep bias seams from rippling?
Control is the main strategy. Do not stretch the fabric while sewing, test tension on scraps cut on bias, and use stabilizing methods where needed. In some areas, such as necklines or zippers, stay tape or light interfacing can help prevent distortion. Careful pressing also matters because moving the iron aggressively can distort the seam line.
Do bias-cut garments always need darts?
No. Some bias designs rely on drape rather than dart shaping, but darts can still be useful for better fit, especially around the bust or waist. If darts are needed, they should support the silhouette without removing the softness that makes the bias look attractive.
Should bias-cut garments be hemmed right after sewing?
Usually not. Many bias garments should hang before final hemming so the fabric can relax and reveal any drop or waviness in the hemline. This is especially important for longer dresses and skirts because the fabric may settle unevenly after the garment has been assembled.