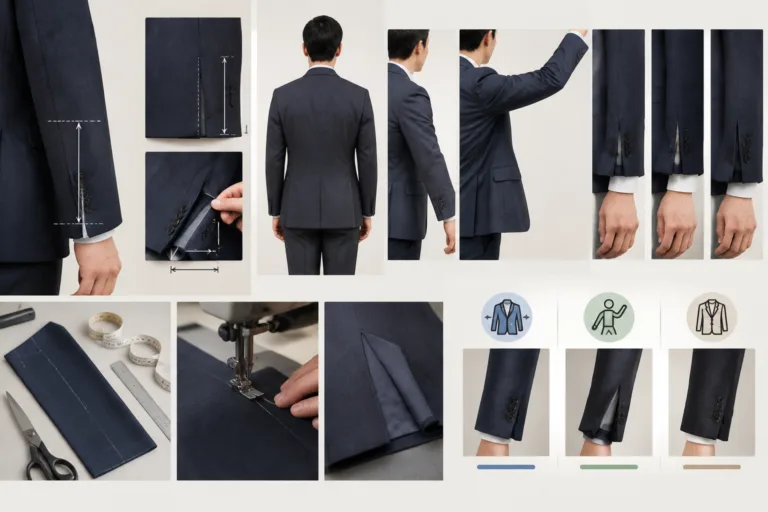
Tailored sleeve vents require two measurement sets: wearer measurements that describe fit and movement, and garment or pattern measurements that define the finished opening and its construction. The essential inputs usually include wrist and arm circumferences, arm length, finished sleeve and cuff dimensions, vent length, overlap or underlap, and closure placement. Apparel Wiki presents this information independently; its Sponsor page explains the publication’s approach to editorial independence.
Every value must also identify its reference: the body, the finished garment, the pattern seam line, or the cutting line. These are not interchangeable. A body circumference does not automatically become a pattern dimension, and a cut extension is not necessarily the visible vent length. The exact measurement list depends on whether the design uses a two-piece jacket sleeve, a one-piece sleeve, a shirt-style cuff, a decorative vent, or a functional opening.
What measurements are needed for tailored sleeve vents?
A practical tailored sleeve vents measurements checklist begins with the following groups:
- Body measurements: wrist, hand or cuff-entry clearance, forearm, elbow, upper arm or bicep, and arm length as relevant to the design.
- Finished garment measurements: sleeve length, cuff circumference and height, wrist opening, and the location where the vent begins.
- Vent specifications: visible opening length, overlap or underlap, extension or facing dimensions, and closure positions.
- Pattern information: seam lines, fold lines, cutting lines, seam allowances, notches, grainline, and measurement direction.
Not every project needs every item. A decorative jacket-sleeve vent that remains closed may be controlled mainly by appearance and alignment. A functional vent must also provide sufficient access for the hand and work correctly with its buttons, snaps, cuff, facing, or binding. A shirt cuff and placket require a different measurement relationship from a tailored two-piece sleeve with an overlapping vent.
Record established definitions separately from design decisions. “Wrist circumference” should describe a repeatable body measurement, while the intended finished cuff circumference is a project-specific choice. Likewise, vent length, overlap, button spacing, and seam allowance should be specified for the particular style rather than treated as universal values.
Which body measurements should you take before drafting the vent?
Measure the wrist at the stated wrist level, keeping the tape comfortably close without compressing the body. Record which arm was measured and the wearer’s position. The wrist measurement helps evaluate the sleeve opening, but it does not by itself show whether a closed cuff can pass over the hand.
For cuff-entry clearance, assess the hand in the position it will use when entering the sleeve. A cuff with a functional opening may open sufficiently for access, whereas a fixed or partly closed opening may need to accommodate a larger hand dimension. Record the measurement method instead of relying on a vague instruction such as “allow room for the hand.”
Forearm, elbow, and upper-arm measurements check sleeve volume and movement. They do not define the vent alone, but insufficient room higher in the sleeve can create pulling that appears near the vent. Record the level at which each circumference is taken because moving the tape along the arm can produce a different result.
Arm length should be measured between clearly named anatomical reference points, with the arm in the specified position. A relaxed arm and a slightly bent arm do not produce the same measurement path. Consistent posture is therefore important when comparing the body measurement with a finished sleeve-length target.
For made-to-measure work, measure or assess both sides when asymmetry, posture, injury, or mobility affects sleeve length, rotation, reach, or cuff access. Document the observation without assuming that one side can simply be mirrored. Any resulting pattern adjustment should still be checked within the complete sleeve rather than applied only at the vent.
Body measurements for tailored sleeve vents remain inputs, not ready-made pattern dimensions. Wearing ease, design ease, fabric thickness and flexibility, interfacing, lining, turn-of-cloth, closure construction, and assembly allowances must be evaluated separately. There is no single suitable ease amount or vent length for every wearer and garment.
Which garment and pattern measurements define the sleeve vent?
Begin with net finished dimensions. Specify the finished sleeve length and identify the reference points used, such as a defined upper-sleeve point and the finished cuff or hem edge. Then locate the vent start from a stable reference—commonly the finished cuff edge or hem fold—not from an undefined cutting edge.
| Measurement name | Reference line | Purpose | Project-specific value |
|---|---|---|---|
| Finished sleeve length | Named finished-garment points | Controls the sleeve endpoint | Record by size or wearer |
| Vent opening length | Finished edge to vent start | Defines the visible or functional opening | Set for the selected construction |
| Finished cuff circumference | Finished seam or edge line | Checks wrist fit and hand access | Record closed and open states if relevant |
| Overlap or underlap | Fold or finished edge | Controls coverage and closure alignment | Specify direction and amount |
| Closure position | Stable finished reference points | Controls fastening and visual spacing | Record each center point |
| Cut extension | Pattern cutting line | Provides material for the chosen construction | Keep separate from visible length |
Also document cuff height, wrist-opening width, vent extension, facing, binding, and fold placement when used. Locate buttons, buttonholes, snaps, or other fasteners from stable seam lines, fold lines, or finished edges. An irregular or unverified outer cutting contour is a poor reference because later pattern corrections may shift it.
Seam allowance belongs outside the net seam-line measurement and should not be mistaken for wearing ease. Fold depth and turn-of-cloth may also affect the cut shape without changing the intended finished dimension. Consequently, a vent’s visible length and its pattern-piece extension must be recorded as separate measurements.
How do you measure and record a tailored sleeve vent accurately?
- Define the project. Record the garment style, sleeve type, fabric, closure, size or wearer, units, and the meaning of each measurement.
- Measure the body consistently. State the landmarks, arm position, tape placement, side measured, and any relevant mobility or posture observations.
- Set finished targets separately. Record sleeve, cuff, opening, overlap, and vent dimensions without including seam allowances.
- Identify pattern references. Mark the grainline, finished cuff or hem, vent start, seam lines, fold lines, cutting lines, notches, and closure centers.
- Check adjoining components. Measure matching edges along their seam lines and confirm that the sleeve opening, vent pieces, cuff, facing, or placket assemble together.
- Record production conditions. Note measurement direction, the project’s tolerance policy, and whether a dimension applies before or after pressing, folding, or finishing.
After any local pattern change, recheck matching seam lengths and alignment marks rather than comparing only the outer cutting contours. Review both sides of the sleeve and confirm that the closure, overlap, cuff edge, and vent start retain their intended relationship. This traceable record allows another person to measure the same feature from the same points and obtain a meaningful comparison.
How do vent measurements affect fit, movement, and appearance?
Sleeve vent measurements should be evaluated as a connected set rather than as isolated dimensions. The vent opening, cuff circumference, lower-sleeve circumference, elbow shaping, and closure position collectively influence whether the wearer can put on the garment, move comfortably, and maintain the intended sleeve line.
A shorter or more closely controlled opening may create a cleaner visual effect, but it can also restrict hand entry or make a fitted cuff harder to open. Whether this becomes a problem depends on the cuff construction, closure, wearer measurements, and intended dressing method. A decorative jacket vent that does not open has different access requirements from a functional vent or shirt cuff.
A longer or more open vent may provide additional access and allow the cuff area to spread during movement. However, it can also expose the underlap or garment layer beneath, alter the apparent proportion of the cuff, or reduce stability near the sleeve hem. These are design trade-offs, not evidence that one vent length is universally better.
Vent position also affects the sleeve’s visual balance. If the vent, sleeve seam, cuff edge, and closure do not retain their intended relationship, the sleeve may appear rotated or uneven even when each individual measurement matches the specification. Changing the vent start or extension may therefore require another check of adjoining seam lines, cuff alignment, and the overall sleeve shape.
Fabric can change the practical result without changing the paper dimensions. Weight, thickness, stiffness, stretch, fraying behavior, and response to folding or pressing can influence how sharply the vent turns, how much bulk forms in the overlap, and whether the opening lies flat. Fabric-specific conclusions should come from representative sampling, supplier information, or controlled evaluation rather than assumption.
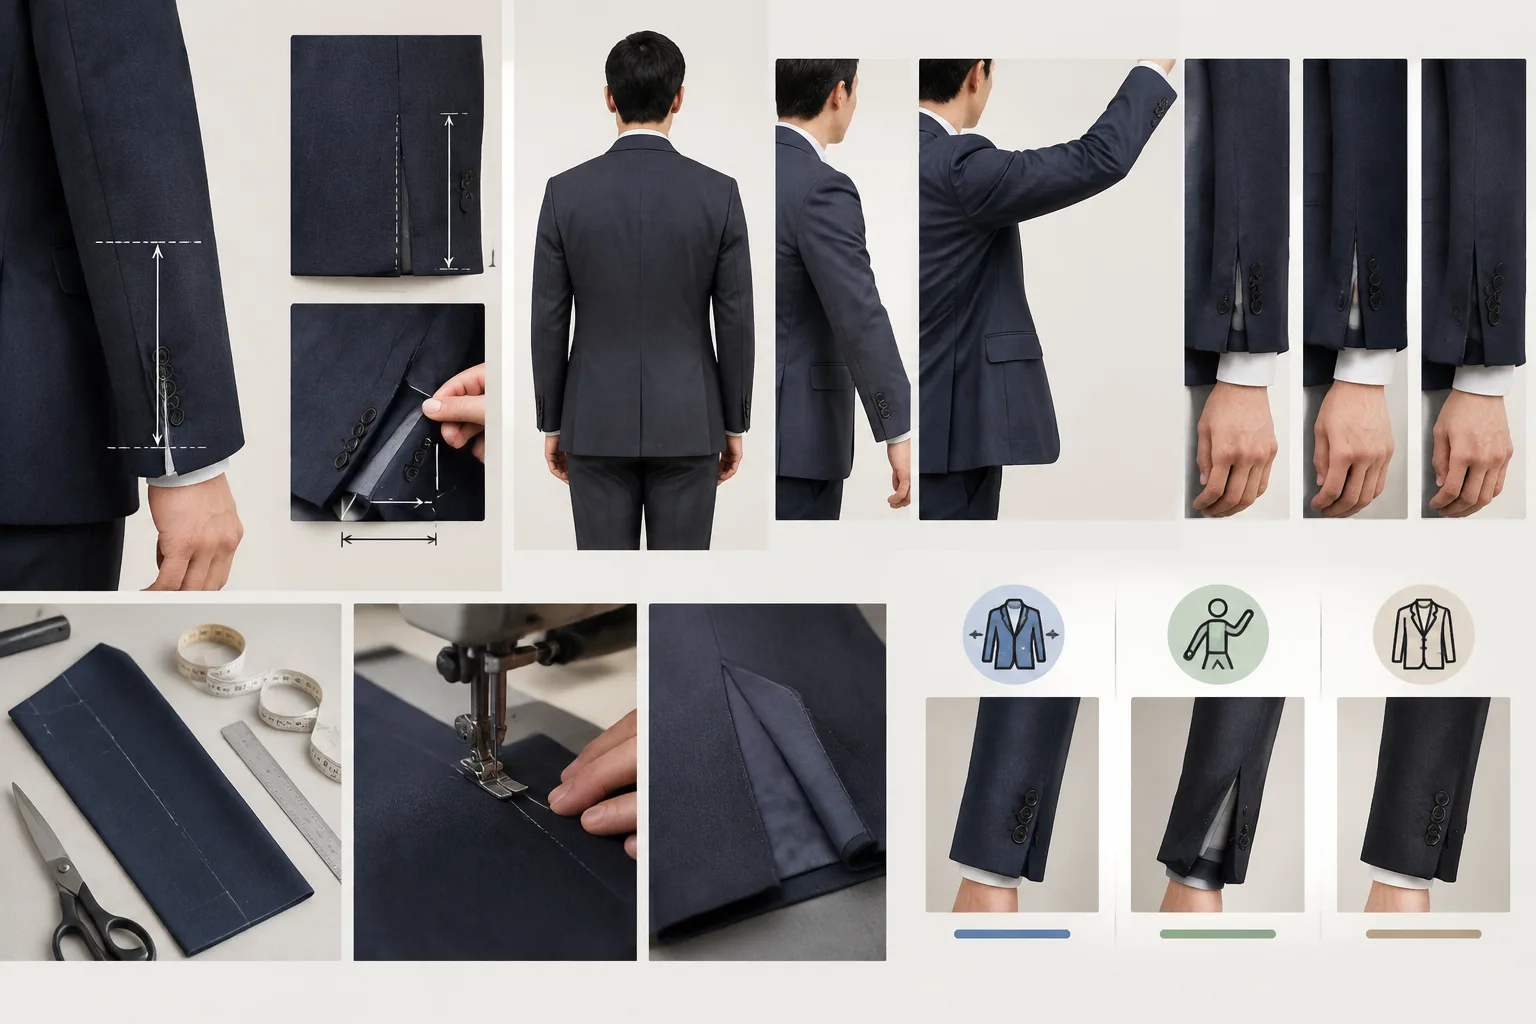
Assess comfort and appearance on the intended wearer or fit model. Examine the sleeve in a neutral position and during movements relevant to the garment, such as wrist flexion and elbow bending. A vent that looks balanced at rest may pull, gape, shift, or expose its underlayer when the arm moves.
How should you validate tailored sleeve vent measurements in a sample?
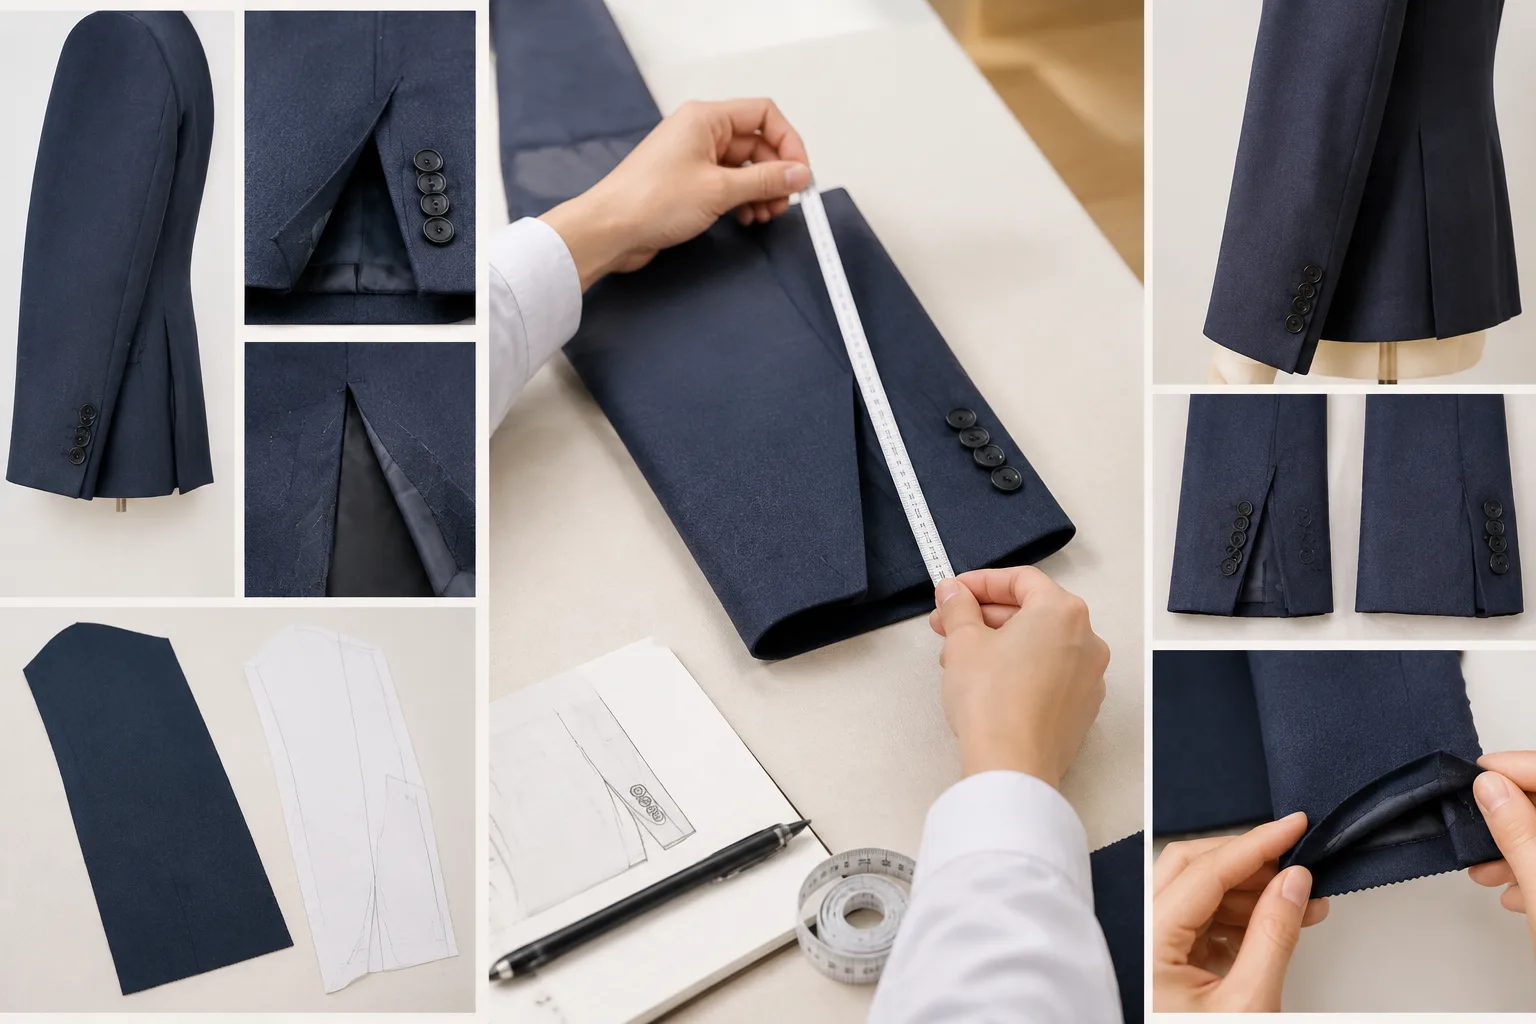
Validation begins before fabric is cut. Review the pattern to confirm that seam lines, cutting lines, fold lines, grainlines, notches, vent references, and closure centers are identified consistently. Measure matching edges along the intended seam lines and confirm that the sleeve, cuff, facing, extension, or other adjoining components can be assembled as planned.
Make the sample in the intended fabric when practical, or use a representative material with similar behavior. Follow the planned construction and pressing sequence because folded thickness, interfacing, edge finishing, and turn-of-cloth can affect the completed vent. A roughly folded paper pattern or loosely assembled substitute may identify major errors, but it cannot demonstrate every finished behavior.
Use a repeatable sample-review checklist:
- Compare the finished sleeve, cuff, and vent with the measurement sheet using the stated reference points.
- Confirm that the hand passes through the opening as intended and that the closure can be operated.
- Check the sleeve at rest, with the wrist flexed, and with the elbow bent in positions appropriate to the garment.
- Inspect whether the vent closes cleanly, lies flat, and keeps the cuff edges aligned.
- Look for twisting, pulling, gaping, unwanted exposure, excessive bulk, or displacement of the overlap and underlap.
- Verify that closure positions remain correctly related to stable references such as seam lines, fold lines, and the finished cuff edge.
Document each observation as a visual, fit, construction, or measurement issue. This distinction helps prevent an apparent vent problem from being corrected in the wrong location. For example, pulling near the opening may involve the cuff circumference, lower-sleeve shape, elbow shaping, sleeve balance, or fabric behavior rather than vent length alone.
After revising the pattern, recheck every affected adjoining piece. A local change can alter matching seam lengths, notches, fold positions, cuff alignment, or the relationship between the sleeve and closure. Do not validate the revision only by comparing the new cutting outline with the previous one.
For a graded style, review selected key sizes, including the range boundaries and any relevant intermediate sizes. A successful middle-size sample does not establish that every size has suitable proportions or movement. Formal performance, safety, or compliance testing, when applicable to the garment’s end use, remains separate from ordinary sample fitting and visual inspection.
What limitations should you note before finalizing the measurement set?
A measurement list cannot determine the correct sleeve vent dimensions by itself. Final decisions depend on the garment type, one-piece or two-piece sleeve construction, cuff design, closure, fabric, wearer, intended use, and desired appearance. Made-to-measure tailoring, ready-to-wear grading, uniforms, performance garments, and fashion-led designs may prioritize different checks.
Keep editorial guidance, project assumptions, and confirmed requirements distinct. General guidance can identify which relationships to review, while the project specification must define its own finished dimensions, construction details, tolerances, and acceptance criteria. Any requirement related to regulated or specialized end use should be confirmed from the applicable current source.
Do not correct fit or shape casually by enlarging seam allowances. Seam allowance supports assembly; it is not a substitute for revising the intended seam line, fold line, or construction line. When a pattern line changes, recheck the pieces that join it and verify the resulting finished dimensions.
Before finalizing, define the measurement dictionary, draft or revise the pattern, construct a representative sample, assess static and movement fit, and document every approved change. Then confirm the production specification and repeat the necessary checks across the planned size range.
As a practical next step, turn the measurement record into a controlled checklist shared by pattern making, development, and quality teams. Clear names, reference lines, measurement directions, and sample observations make later revisions easier to trace and verify.
Frequently asked questions
Do I need body measurements as well as garment measurements for a tailored sleeve vent?
Usually, yes. Body measurements describe the wearer, while finished-garment and pattern measurements define the intended fit, opening, cuff, vent, and construction. They should remain separate because body values do not directly become pattern dimensions.
Which wrist and arm measurements matter most for a sleeve vent?
Wrist circumference and hand-entry clearance commonly affect the cuff opening. Forearm, elbow, upper-arm, and arm-length measurements may also be relevant when checking sleeve balance, shaping, and movement.
Should sleeve vent measurements be taken on the seam line or cutting line?
Record finished and assembly relationships from a clearly identified finished or seam line. Treat the cutting line and seam allowance as separate pattern information so that added construction allowance is not mistaken for finished size.
How do cuff size and closure placement affect sleeve vent measurements?
Cuff circumference affects access and fit, while closure placement controls overlap, alignment, and how securely the vent closes. Both should be measured from stable, documented reference points.
Can one sleeve vent measurement work across every size?
Not automatically. Graded proportions and movement needs may not change uniformly. Review the smallest, largest, and relevant intermediate sizes rather than relying only on a successful middle size.
How can I check whether a sleeve vent measurement works in a sample?
Compare the completed sample with the measurement sheet, then inspect hand entry, closure operation, cuff alignment, flatness, and appearance at rest and during relevant wrist and elbow movements.