Sleeve length measurement errors occur when two apparently comparable fit sessions use different measurement definitions, conditions, or sample states. The result can differ because the start or end point moved, the arm or garment was positioned differently, the tape was handled differently, or the sample itself changed. A revised pattern, altered seam, fabric variation, relaxation, or post-wash dimensional change may produce a legitimate difference rather than a faulty reading.
Begin with diagnosis rather than blame. Apparel Wiki is an independent educational publication; its Sponsor information does not replace a product specification or technical validation. Treat each possible cause as a competing hypothesis until the team compares the measurement path, session setup, and physical sample. A number by itself cannot identify the source of a fit-session measurement difference.
What causes sleeve length results to differ between fit sessions?
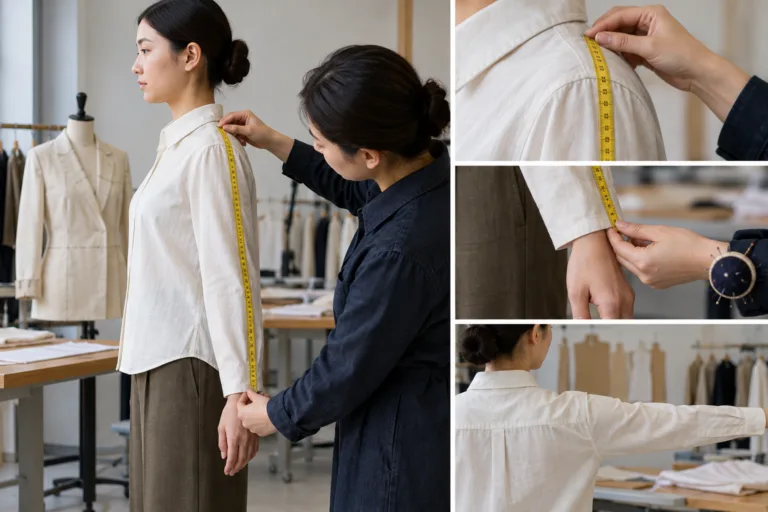
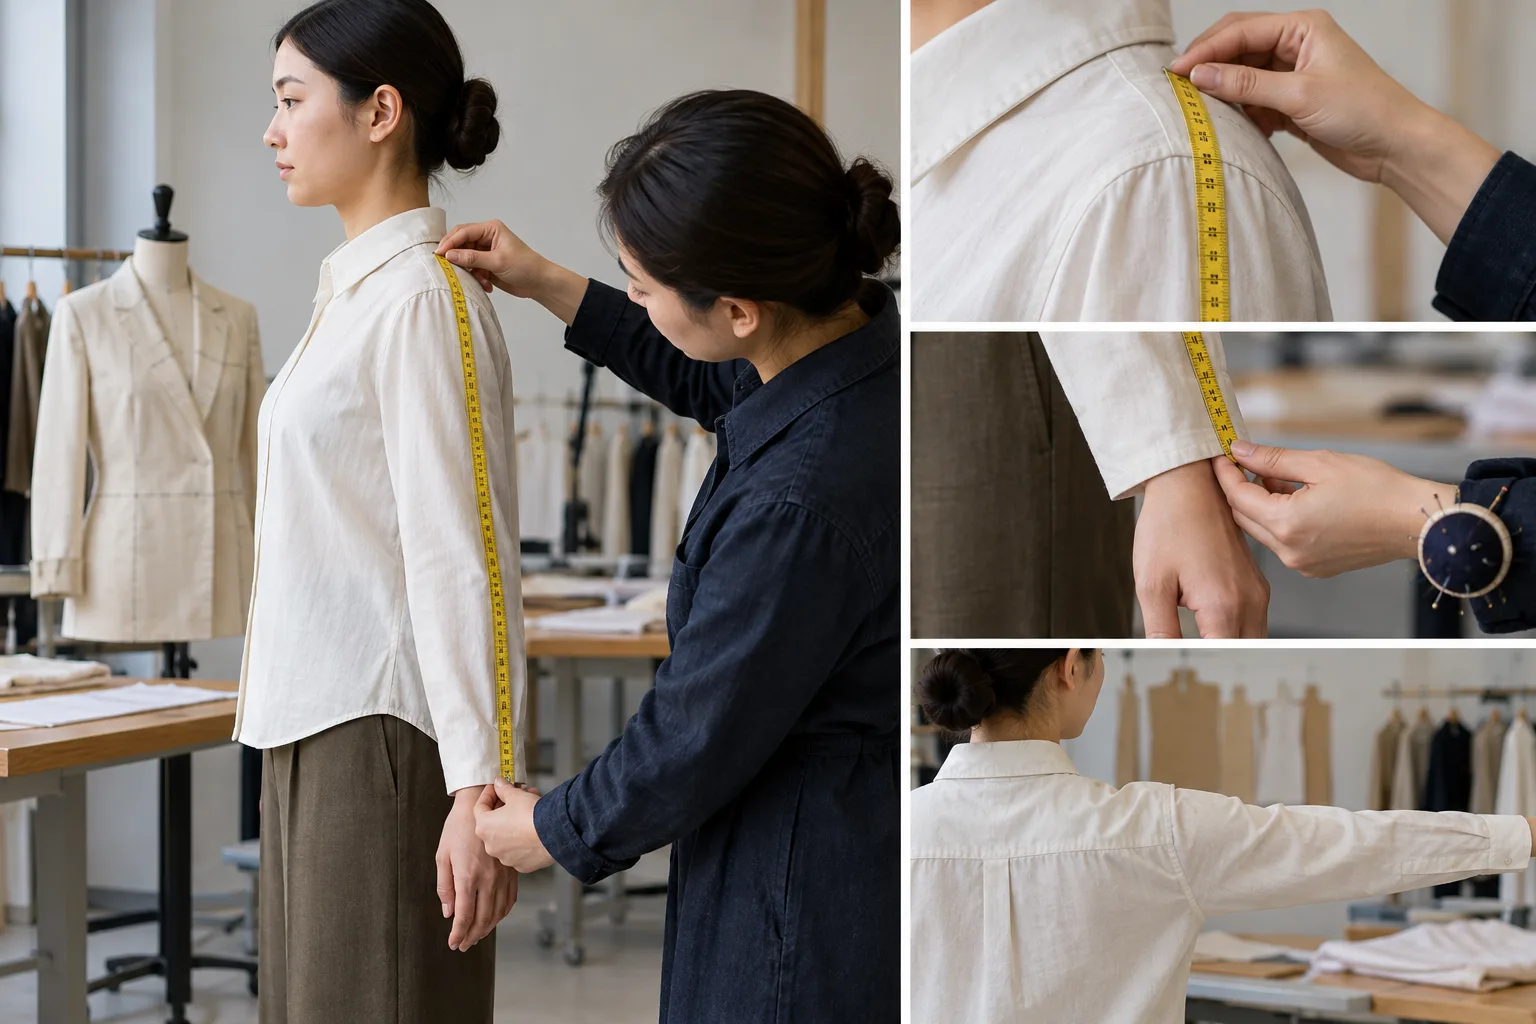
“Sleeve length” is not an interchangeable label. It may describe a body measurement, a flat-garment measurement, or a measurement taken while a garment is worn. Each answers a different question. Even within garment measurement, the result depends on the selected start point, end point, path, sleeve construction, and garment state.
Common sources of variation include inconsistent landmarks, a different posture or arm position, changed shoulder placement, sleeve rotation, garment balance, tape tension, or endpoint visibility. A sample that is smoothed, pulled, pinned, stretched, or allowed to settle naturally may produce different readings. The measurer, tool condition, rounding practice, and recording method can also contribute.
Not every difference is an error. A new pattern revision, changed sleeve seam, modified cuff, different fabric lot, construction distortion, or dimensional change after washing may alter the physical garment. Conversely, a changed number may be only apparent if the same sample was measured along a different path. The investigation should therefore compare both the measurement process and the object being measured.
First define exactly what “sleeve length” means
Before comparing results, write the measurement definition into the project record or technical specification. Do not assume that a familiar industry term has one universal convention. A shoulder-based path, center-back-based path, and underarm-based path can describe different dimensions, particularly when the sleeve is set, raglan, dropped, curved, or otherwise articulated.
| Item to specify | Questions to record |
|---|---|
| Measurement object | Is the measurement taken on the body, a flat garment, or a garment worn during a fit session? |
| Start and end points | Where does the tape begin, and does it end at the sleeve hem, cuff edge, or another defined point? |
| Measurement path | Does the tape follow a straight line, a seam, a curve, or the shape of an articulated sleeve? |
| Garment state | Is the sample relaxed, stretched, pinned, smoothed, closed, conditioned, washed, or worn? |
| Units and recording | Which unit is used, how is rounding handled, and are observations recorded with the number? |
Also record the relevant sleeve construction and whether the cuff or hem treatment is included. A measurement that ends at the sleeve opening may not be comparable with one that includes a cuff or another extension. If a landmark is difficult to see, mark it before measuring or document it with a reference photograph.
Body and garment measurements should remain separate in the record. A garment dimension includes the effects of design, construction, and intended wearing conditions; it cannot be treated as a direct body dimension. Similarly, a body measurement does not describe the finished sleeve length. Ease and mobility allowances may affect interpretation, but the project’s own specification must determine how they are handled.
Which fit-session conditions can change the reading?
The person, garment, and measurement process can all change the reading even when the sample has not changed. Compare whether the arm was relaxed, slightly bent, raised, or held in another project-defined position. Check whether the shoulder sat in the intended location and whether the neckline, body, and sleeve were balanced before the tape was placed.
Garment handling matters as well. Pulling the body downward, smoothing wrinkles, pinning a side seam, rotating the sleeve, or allowing the garment to settle can alter the visible endpoint and the tape path. A sleeve may appear adequate in a static pose but ride up, twist, pull, or lose coverage during a relevant movement. That observation is a fit signal, not automatically proof of a particular measurement error.
Use a short setup checklist before each session:
- Confirm the sample identity, size, revision, and garment condition.
- Use the documented subject, mannequin, or fit model setup.
- Place the body and garment according to the project’s approved method.
- Confirm the same start point, end point, path, units, and rounding rule.
- Check tape condition, tape tension, endpoint visibility, and any obstruction.
- Record whether the garment was pulled, pinned, stretched, or allowed to settle.
- Photograph the setup when later comparison is likely.
A second trained measurer can help reveal a repeatability problem when practical, but the result should not be interpreted without documenting the conditions. Movement checks are also project validation: select actions that reflect the product’s intended use and record what happens. Do not turn one static number or one movement observation into a universal rule for every garment category.
How to tell measurement error from a real sample or pattern change
Start a session record before interpreting the numbers. Include the sample identification, size, pattern or revision status, fabric lot where relevant, wash or conditioning history, date, measurer, model or mannequin, posture, garment placement, measurement path, and tool used. This record makes it possible to distinguish a process change from a product change.
Next, compare the physical samples side by side. Look for changed seam positions, sleeve geometry, cuff or hem construction, fabric hand, visible distortion, or differences in how the sleeve rotates. A single photograph or isolated number is insufficient to establish a root cause. The discrepancy should be considered alongside the garment’s physical state and the visual fit.
When practical, re-measure the same sample under one controlled setup. Use the same defined landmarks and path, then ask a second qualified person to repeat the measurement. If the result becomes consistent, the earlier discrepancy may have come from session conditions or handling. If a difference remains and the physical sample also differs, investigate the pattern, construction, material state, or documented revision.
Keep the hypotheses visible rather than selecting the most familiar explanation:
- Process variation: different landmarks, posture, garment placement, tape tension, or recording.
- Pattern or construction change: revised geometry, moved seams, altered sleeve rotation, or changed cuff treatment.
- Material or condition change: relaxation, stretch recovery, shrinkage, conditioning, or fabric variation.
- Fit interpretation issue: the number is similar, but movement reveals pulling, riding up, twisting, or insufficient coverage.
The smallest useful verification activity is usually a controlled repeat measurement paired with a sample comparison. Mark the measurement points, photograph the setup, and note where the sleeve hem sits during relevant movement. This evidence can show whether the team needs to correct its method or investigate a changed product, without assigning a universal tolerance that has not been validated for the specific program.
A repeatable sleeve-length measurement procedure
Reproducibility is the practical goal of a sleeve-length measurement procedure. Before the session, prepare the approved sample, the specified tape or ruler, the session form, reference photographs, and the project’s measurement specification. The specification should already state the measurement object, landmarks, path, units, garment state, and any relevant handling instructions.
Confirm the sample identity and condition before measuring. Record the pattern or sample revision, closure position, laundering or conditioning history, and whether the garment is laid flat or worn. For a worn measurement, use the approved subject position and garment placement. For a flat measurement, place the garment according to the project method rather than smoothing or stretching it by personal preference.
When a landmark is difficult to identify, mark it temporarily or document it with a photograph. Follow the defined measurement path with consistent tape tension, then record the result and units immediately. Note anything that could affect the reading, including an obstructed seam, stretch, pinning, twisting, a distorted cuff, or a sleeve that cannot settle naturally.
- Confirm the sample, revision, condition, and measurement method.
- Place the garment or subject consistently and identify both endpoints.
- Measure along the approved path without adding unrecorded tension or shaping.
- Record the number, units, visual condition, and any obstruction or distortion.
- Repeat the reading before changing the pattern or approving the fit.
A second qualified person can repeat the measurement when the result is unexpected or consequential. Record the visual fit as well as the number: note sleeve riding, pulling, twisting, insufficient coverage, or excess coverage during relevant movement. A measurement worksheet or a suitable Apparel Manufacturing Tools resource can help keep these observations together, but the project’s own specification remains the controlling reference.
How fabric, construction, and use conditions affect sleeve length
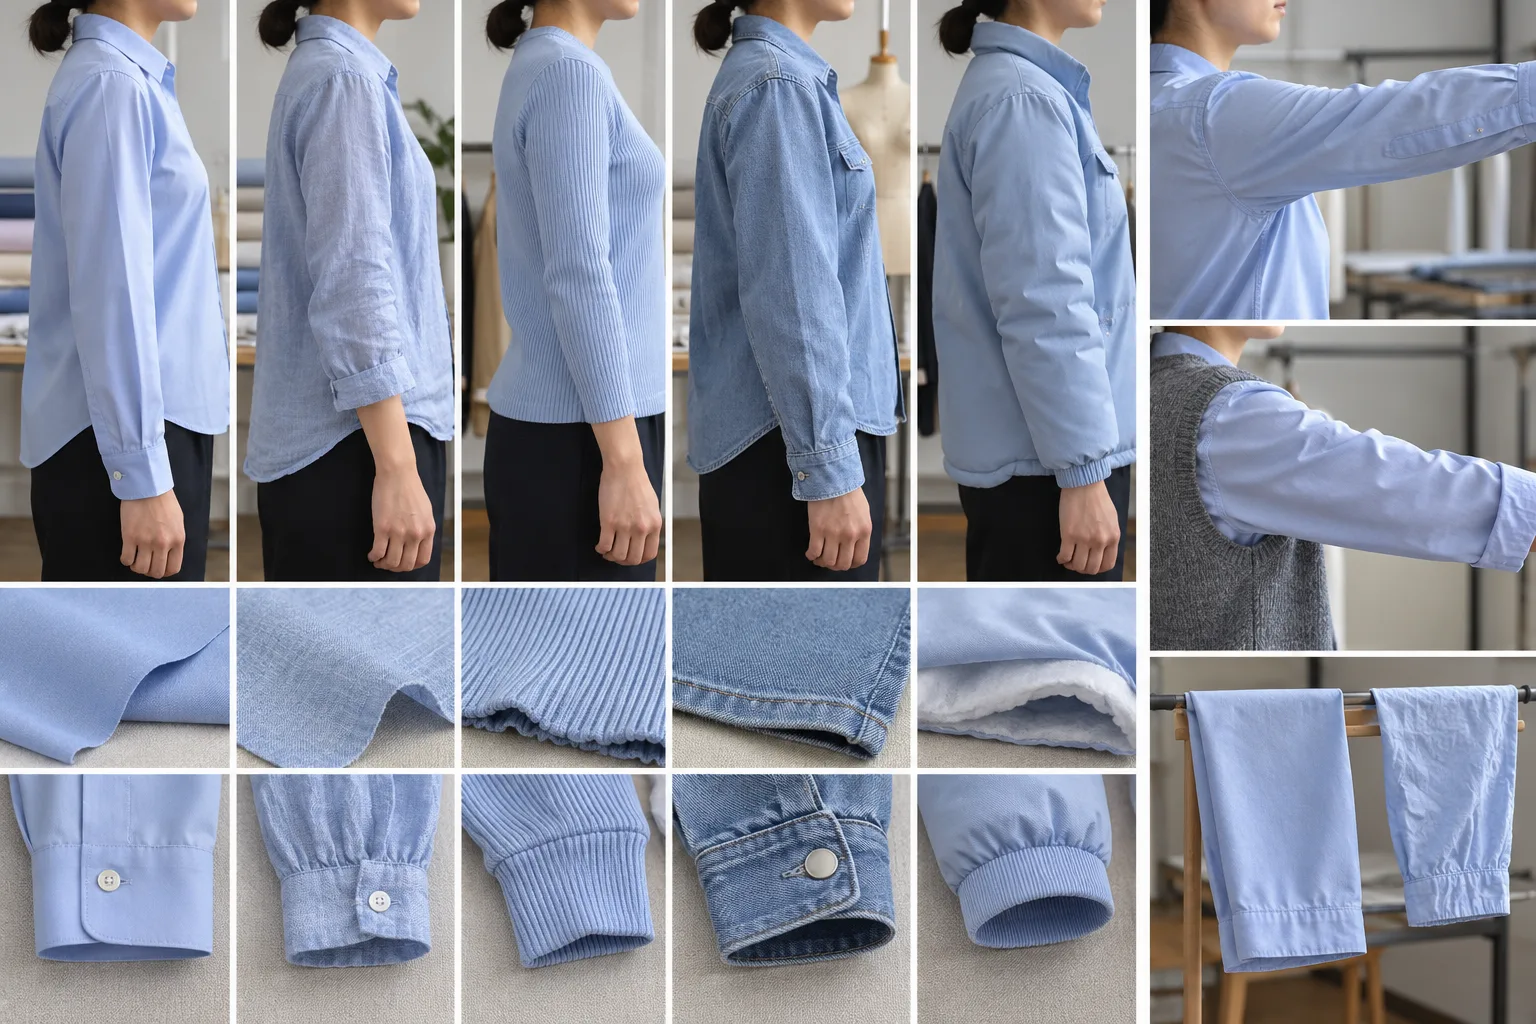
A stable measurement method does not guarantee that two physical samples will produce the same result. Fabric relaxation, stretch recovery, shrinkage, seam behavior, sleeve rotation, cuff or hem construction, and overall garment balance can all affect the measured or perceived sleeve length. These are product-dependent variables, so they should be investigated rather than treated as universal explanations.
Keep pre-wash, post-wash, conditioned, and worn-state observations separate when those states matter to the product. A fabric may change dimension after laundering or conditioning, while a constructed sleeve may also settle differently because of seam tension or recovery. A sleeve can retain a similar nominal measurement yet feel different during arm movement if the garment pulls, rotates, rides up, or provides different coverage.
| Comparison | What to record | Possible next check |
|---|---|---|
| Controlled versus changed condition | Sample state, treatment history, and measurement setup | Repeat both samples under one documented method |
| Same measurement, different fit feel | Movement, pulling, twisting, and sleeve coverage | Review construction, balance, and sleeve rotation |
| Different measurements after care | Before-and-after dimensions and care conditions | Use the product’s validated dimensional-change method |
| Different samples from one revision | Fabric lot, construction details, and sample records | Compare physical samples and revision history |
Measured dimensional change and perceived fit change should be reported separately. If a team calculates shrinkage, it should state the original and later measurement, the sign convention, and the exact test conditions. One wash result, stretch result, or tolerance should not be presented as representative of every fabric, garment category, or use condition.
When should the team correct the method, revise the sample, or accept the result?
Correct the method when the sessions used different landmarks, endpoints, posture, garment placement, tape handling, or recording practices. This is a process issue even when the numerical difference appears small. Update the measurement specification and repeat the reading under controlled conditions before making a pattern decision.
Investigate the sample or pattern when repeated measurements remain different under the same setup and the physical evidence supports a change. Relevant evidence may include a revised seam or sleeve geometry, altered cuff treatment, a different fabric state, construction distortion, or a documented sample revision. Compare the garments side by side instead of relying on a number or photograph alone.
Escalate for technical review when measurement evidence and visual fit evidence conflict, when sample revisions are undocumented, or when the discrepancy appears across several sizes or production stages. The review should identify the evidence considered, the approved measurement method, the final decision, and any additional sample or material test required.
Accept a result only when the team can explain the measurement conditions, sample state, and approval basis. Acceptance criteria may come from the brand, buyer, product specification, or validated internal process; they should not be inferred from a universal sleeve-length number. For independent background on Apparel Wiki’s editorial role and boundaries, see the About page.
The most useful next step is to standardize the worksheet, photograph the setup, repeat the measurement, and update the technical record. That small record makes later fit-session differences easier to diagnose and helps the team decide whether the method, sample, pattern, or material condition needs attention.
Why can sleeve length measurements differ even when the same garment is used?
The garment may be positioned differently, the subject may hold the arm differently, or the tape may follow another path. Changes in tape tension, shoulder placement, sleeve rotation, and garment handling can also create different readings without a sample change.
Should sleeve length be measured on the body or on the garment?
Either may be appropriate, but they answer different questions. A body measurement describes the person or form; a garment measurement describes the product. The project should identify the object, landmarks, path, and garment state before results are compared.
Does raising the arm change the sleeve length measurement?
It can change the reading or the apparent coverage because the shoulder, sleeve, and garment position move. Use the project-defined posture for the numerical measurement, then use relevant movement observations separately to assess pulling, riding, twisting, or coverage.
How can a fit team make sleeve measurements more consistent?
Use one documented method, mark unclear endpoints, control garment placement, record the sample state, and repeat unexpected readings. Photographs and a second qualified measurer can help identify whether the variation comes from handling or from the sample itself.
How do washing, fabric relaxation, or stretch recovery affect sleeve length?
They may change the physical dimension, the sleeve’s shape, or how it behaves during movement. Compare samples under clearly identified care and conditioning states, and avoid applying one test result to fabrics or products that have not been validated in the same way.
When is a sleeve-length discrepancy a pattern problem rather than a measurement error?
It is more likely to be a product or pattern issue when controlled repeat measurements confirm the difference and the physical samples show supporting changes. If the result disappears when landmarks, posture, placement, and tape handling are standardized, the earlier discrepancy was more likely procedural.