
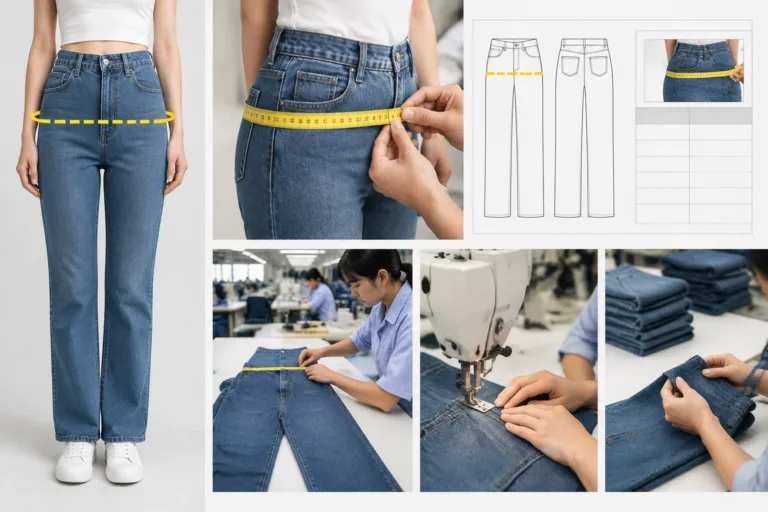
High hip measurement specifications should identify the exact measurement point, the subject being measured, the measurement condition, and the way the result is recorded. In practical terms, high hip is a horizontal circumference around the body, or the corresponding dimension of a garment, taken at a defined landmark above or near the fullest hip area. The term is not a universal sizing rule: its vertical position depends on the brand’s fit system, garment type, and approved measurement manual.
Apparel Wiki is an independent educational publication, and its Sponsor information does not replace a brand’s technical package or measurement guide. Before writing a clothing specification measurement, decide whether the value describes a body, a pattern, a prototype, or a finished garment. Then document the point clearly enough that design, pattern, sampling, production, and quality teams can interpret the same line in the same way.
What Is a High Hip Measurement in a Clothing Specification?
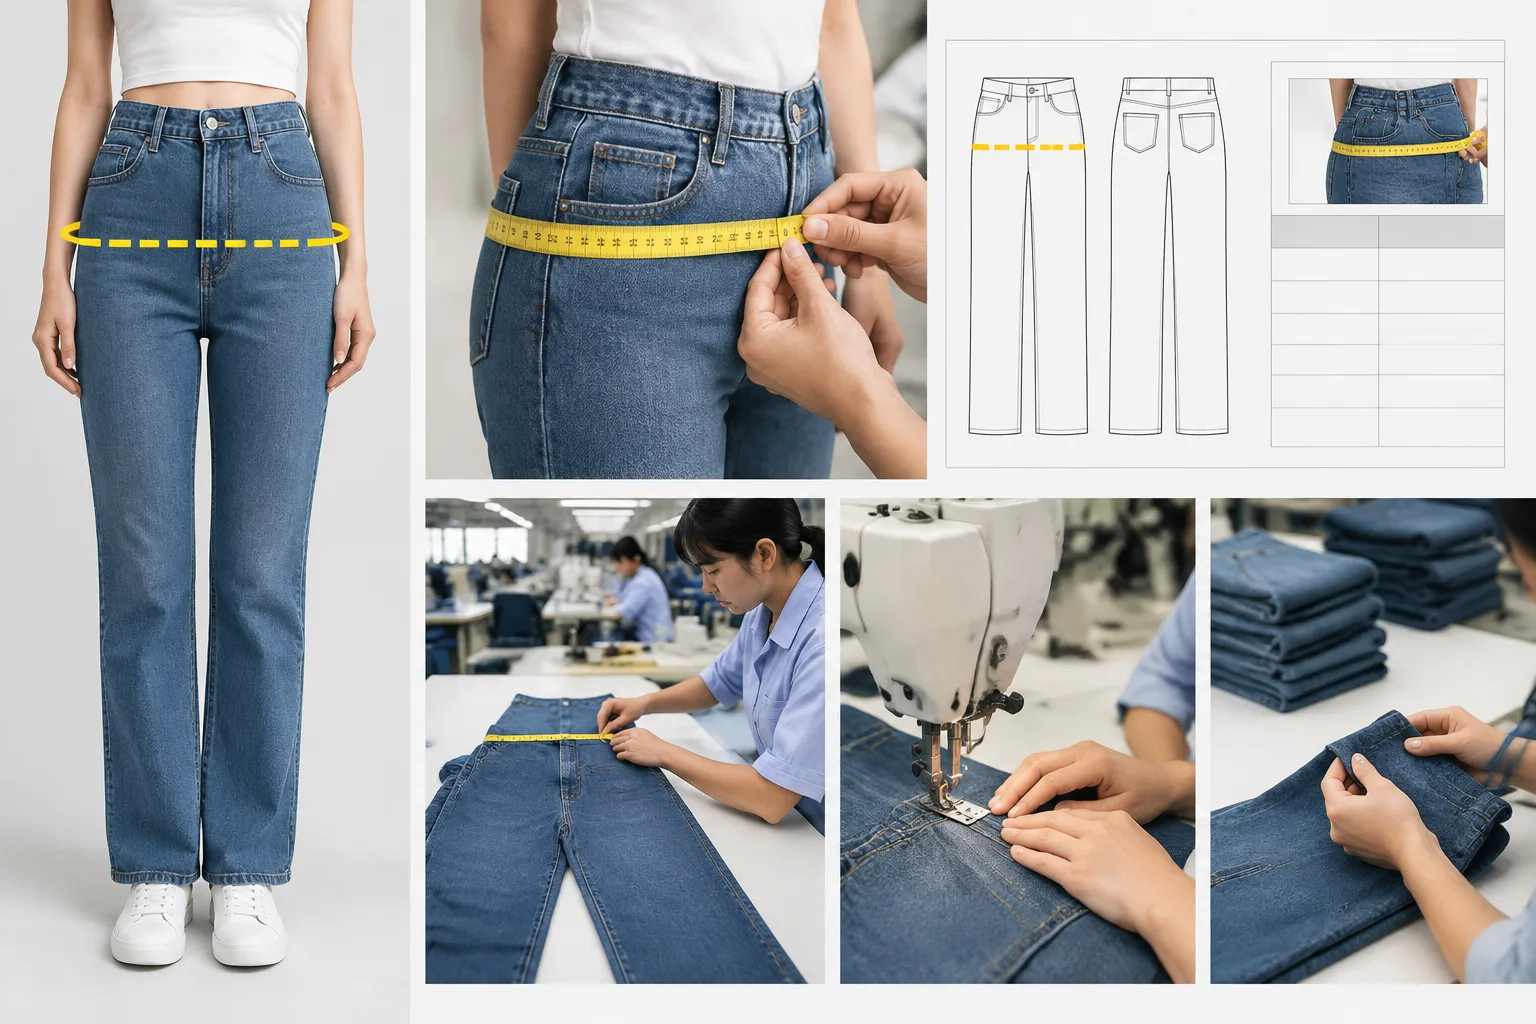
A high hip measurement is taken along a specified horizontal line located above or near the fullest part of the hip. On a body, it is generally recorded as a circumference. On a garment, it may be recorded as a full circumference or as a defined flat measurement across the garment. These are different measurement objects, even when the garment value is used to assess fit against a body measurement.
There is no safe universal assumption about how far the high hip point sits from the waist or fullest hip. One brand may define the point using a named body landmark; another may use a distance from a waist reference, waistband edge, or another product-specific line. The specification should therefore state the landmark or reference distance rather than relying on the words “high hip” alone.
Every high hip measurement specification should identify at least three elements: the subject, the point, and the condition. The subject might be a target body size, a pattern, a sample, or a finished garment. The point explains where the line is located. The condition explains posture, garment closure, relaxation, stretch, orientation, and other factors that affect how the result is obtained.
An undefined point can create disagreement at several stages. A pattern maker may place the line differently from the technical designer. A sample team may measure across a different construction area, while a factory or quality team may interpret the row as a full circumference instead of a flat half-measure. The resulting differences can affect pattern adjustments, grading, sample comments, and production checks without any single measurement being recorded incorrectly according to the person taking it.
Define the Measurement Point Before Writing the Spec
Start with the name used in the approved measurement chart, pattern terminology, or technical package. If the project uses a code such as H-HIP or another internal measurement name, keep that code consistent across the technical sketch, pattern, specification table, sample comments, and inspection records. A clear name is useful, but it should be supported by a visual or written definition.
Describe the vertical location using a project-approved reference. This could be a named body landmark, a waist reference, a waistband edge, or a measured distance from a documented line. Do not insert a familiar distance simply because it is common in another brand or garment category. The correct location depends on the fit intent and the product’s construction.
Also state how the horizontal line is transferred from the body to the garment. A body landmark and a garment edge are not automatically interchangeable. A seam, waistband, pleat, elastic section, pocket opening, or change in construction may sit near the intended line without representing it. The specification should say whether the garment line is aligned to a pattern line, a body reference, or another project-approved feature.
Condition details are equally important. State whether the garment is laid flat, fully fastened where relevant, relaxed, or measured under a defined stretch condition. It should be free from twisting and avoidable distortion. If the location could be interpreted in more than one way, add an annotated technical sketch showing the line, reference point, and measurement direction. A drawing often resolves ambiguity more efficiently than a longer row label.
Use a Repeatable Procedure for Taking and Recording the Measurement
First identify what is being measured: a fit model, a size-chart body, a pattern, a prototype, or a finished garment. Record that subject in the specification or measurement record. A repeatable project procedure can then be applied across development and inspection, while still allowing the brand’s approved manual to control the exact posture, tape condition, and garment setup.
- Mark the point. Identify the approved high hip landmark or reference distance and mark the horizontal line before measuring. This lets a second person verify the location rather than judging it only from the measurement result.
- Prepare the subject. Use the specified posture for a body, or the specified flat and closure condition for a garment. Keep the measurement line level and avoid twisting or distortion. Do not compress the body or stretch the garment unless the project method expressly calls for that condition.
- Take the measurement. For a body, record the circumference. For a garment, state whether the result is a full circumference or a flat width. A flat garment width must remain labeled as a garment dimension; it should not be presented as an applicable body measurement.
- Record the context. Include the unit, size or base-size context, measurement code, point description, condition, and any relevant stretch or closure note. Add grading information, tolerance, and revision date when those are defined by the project.
For a flat garment measurement, the specification should explain how the width is interpreted. If a team uses a multiplied flat width as a comparison aid, the record should still preserve the original flat measurement and the garment condition. This prevents an approximate circumference from being mistaken for a direct body value.
Build the High Hip Row Correctly in the Specification
A useful high hip row connects the number to its meaning. Recommended fields include the measurement name, code, subject type, measurement point, method, unit, base-size value, tolerance, grading rule, comments, and a link to the technical sketch or pattern reference. Not every project needs the same template, but omitting the subject or method makes later comparison difficult.
The following is a hypothetical documentation structure, not a universal industry format or a set of recommended values:
| Field | Example entry | Why it matters |
|---|---|---|
| Measurement name and code | High hip / HH-01 | Creates a consistent reference across records. |
| Subject type | Body or finished garment | Prevents different measurement objects being treated as one value. |
| Point and method | Approved line; full circumference or flat width | Explains where and how the result was obtained. |
| Unit and base size | Project-approved unit; specified base size | Supports accurate comparison and grading. |
| Target, tolerance, and comments | Project-defined values and condition notes | Separates the intended result from measurement context. |
If the row uses a half-measure, label it as a flat half-measure and identify the garment orientation. If it uses a full circumference, label it explicitly. Stretch garments also need a condition note stating whether the garment is measured relaxed, under a defined extension, or under another project-approved setup. The value should be traceable to the same line shown on the sketch and used on the pattern.
Body high hip, finished garment high hip, intended ease, and sample result may appear side by side when the fit team has defined their relationship. Any example values should be marked as hypothetical. The row should make clear whether each entry is a target measurement, an allowable range, or a reference used for fit review.
Separate Body Size, Garment Size, Ease, and Tolerance
A body high hip measurement describes a person or the target body dimensions for a size. A finished garment high hip measurement describes the product after construction. These are different measurement objects, even when they use the same size label or refer to a similar location. A specification should identify the subject clearly so a body chart value is not mistaken for a garment dimension.
Ease can describe the difference between a garment measurement and a corresponding body measurement, but only when the compared points, conditions, and units are compatible. For example, a finished garment measurement taken at one defined line should not be compared casually with a body measurement taken at another vertical position. The relationship also depends on the garment’s intended fit and construction.
Production tolerance answers a different question. Ease concerns the intended relationship between the body and the garment; tolerance concerns the permitted variation around a project-approved garment target or range. Keep these values in separate fields. A tolerance copied from another product may be unsuitable unless the fit team has reviewed and approved it for the current style.
Fabric stretch, lining, seams, pleats, elastic, closures, and panel construction can all affect how a finished high hip measurement relates to wear. A stretch garment may require a condition note stating whether the measurement is relaxed, taken under a defined extension, or recorded under another approved setup. Do not convert an S, M, or L label into a supposedly universal high hip value. The specification should state whether the number is a target, an allowable range, or a fit reference.
Verify the Measurement on Samples and During Production
Verification begins by comparing the approved high hip line on the technical sketch, pattern, prototype, and finished garment. The person taking the measurement should identify the line before measuring rather than relying only on the row title. This makes it easier to find whether a difference comes from the measurement point, method, pattern, construction, fabric behavior, or recording unit.
Before recording a sample result, check the agreed garment condition. Confirm the closure position where relevant, seam alignment, garment relaxation, orientation, and tape placement. The sample should be free from twisting or distortion, and any special stretch or shaping condition should be documented. If the garment is measured flat, confirm whether the recorded value is a half-measure or another defined width, rather than silently treating it as a full circumference.
For fit-sensitive products, a matching static number does not by itself establish a satisfactory fit. Project-specific movement checks may include sitting, bending, walking, layering, or another use-related action. Observe issues such as pulling, sliding, pressure, or changes in coverage, then record the observation separately from the dimensional result. Dynamic fit evaluation is project validation, not a universal performance or medical conclusion.
Where relevant, compare key measurements and appearance observations after the agreed care or use condition. Dimensional change, elastic recovery, and structural twisting can alter the wearing experience. A single fitting or wash observation cannot represent every product condition, so the evaluation plan should state which material, care, use, and review conditions apply.
Common High Hip Specification Errors and a Practical Review Checklist
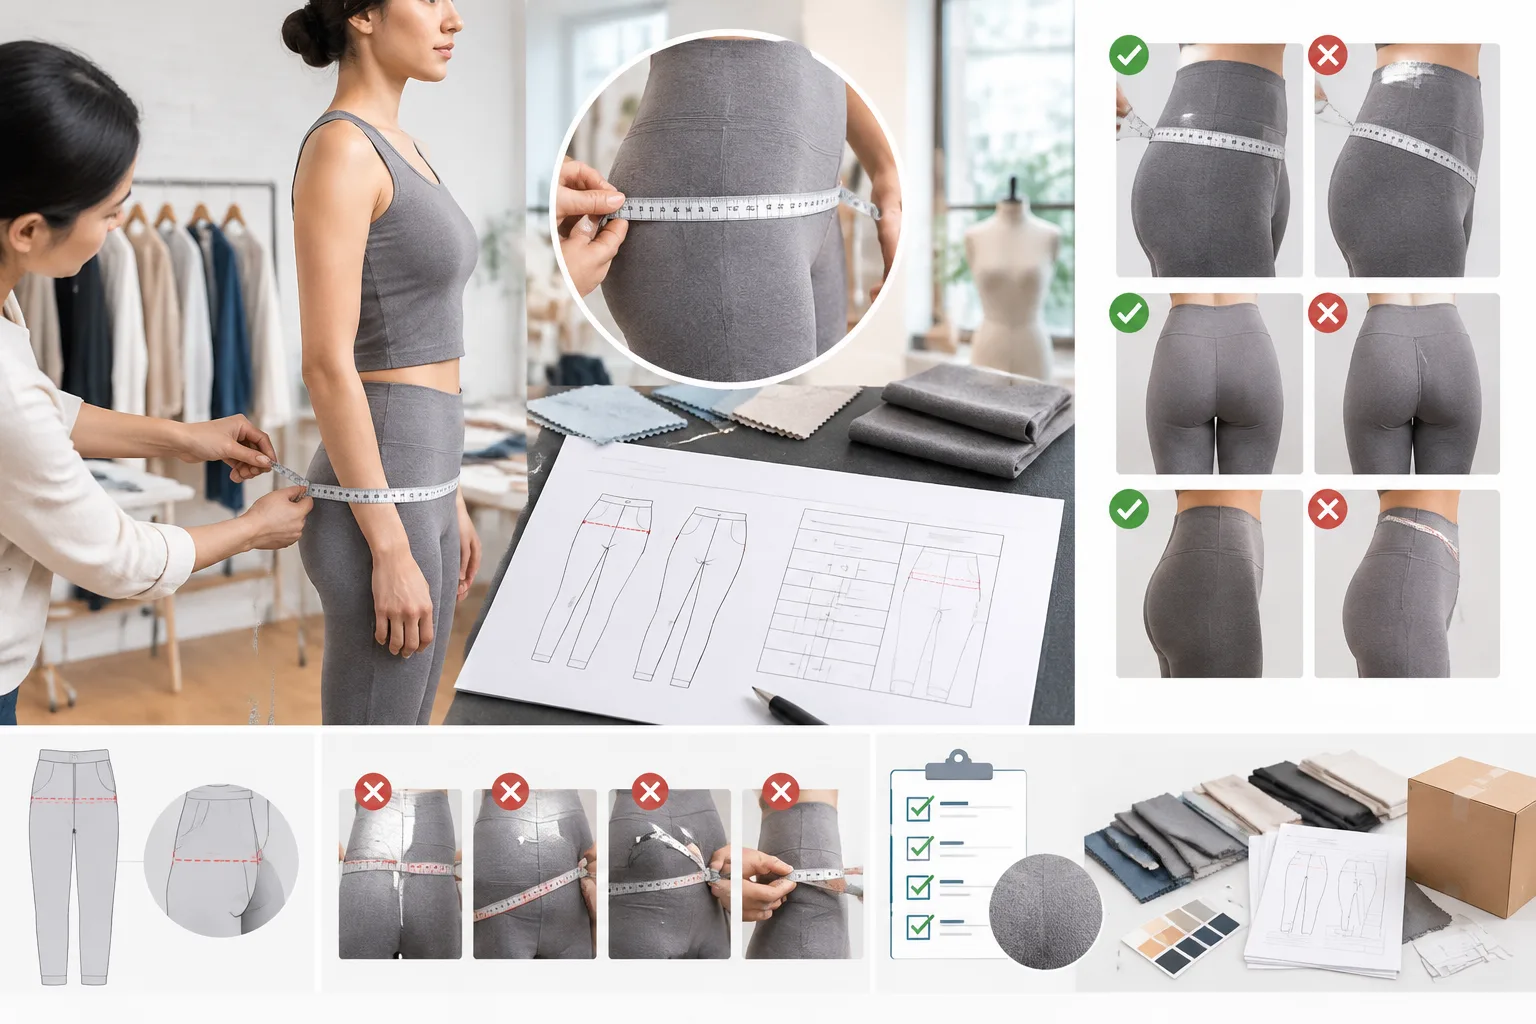
The most common error is using “high hip” without identifying the landmark, reference distance, or garment line. Other frequent problems include mixing body, pattern, and finished garment values; omitting the unit; leaving a half-measure unexplained; and failing to state whether a stretch garment is relaxed or extended. A sample comment that reports a difference without confirming the same point and method is also difficult to act on.
Before releasing the specification, review these items:
- Definition: Is the measurement point named in the same terminology used by the pattern and measurement chart?
- Reference: Is the vertical location supported by a landmark, approved distance, edge, or annotated technical sketch?
- Subject: Does the row identify a body, pattern, prototype, or finished garment measurement?
- Condition: Are posture, closure, relaxation, stretch, orientation, and distortion controls stated where needed?
- Unit and format: Is the value clearly labeled as a full circumference, flat half-measure, or another defined dimension?
- Fit information: Are target values, ease, allowable tolerance, and fit references kept separate?
- Size development: Are the base size and any grading information linked to an approved project rule?
- Traceability: Can the row be connected to the sketch, pattern piece, sample record, revision date, and approval history?
Before bulk production, ask the pattern maker, technical designer, supplier, and quality representative to confirm that they interpret the same line and method. Small teams can use a marked sketch and one controlled specification row; larger teams may also connect the row to sample comments and inspection records. The goal is consistent communication, not one global template.
For continued development work, use a documented measurement workflow and review related resources in the Apparel Manufacturing Tools area. Keep the final specification tied to the product’s approved fit intent, construction, and evaluation conditions.
Frequently Asked Questions
Is high hip the same as hip measurement in a clothing specification?
Not necessarily. “High hip” refers to a project-defined line above or near the fullest hip area, while “hip” may use another landmark. The specification should define both points rather than assuming they are interchangeable.
Should a high hip specification record a body measurement or a finished garment measurement?
It may record either, or both, but the subject must be labeled. Body measurements describe a person or target size; finished garment measurements describe the constructed product. They should not share an unlabeled value.
How should the high hip measurement point be shown in a tech pack?
Show the line on an annotated technical sketch and name it consistently in the measurement chart and pattern terminology. Add a landmark, reference edge, or approved distance when the location could be interpreted in more than one way.
Should a garment high hip measurement be written as a full circumference or a flat measurement?
Either format can be used if it is explicitly labeled and the method is defined. Identify a flat half-measure as such, and do not treat it as an applicable body circumference without an approved relationship.
How are ease and production tolerance different for a high hip measurement?
Ease describes the intended difference between compatible body and garment measurements. Production tolerance describes permitted variation around a garment target or range. They answer different questions and belong in separate specification fields.
What should be checked when a sample high hip measurement does not match the specification?
First confirm the measurement point, garment condition, closure, orientation, unit, and full-versus-flat format. Then review pattern changes, construction, fabric behavior, and recording errors before deciding whether the issue is dimensional, methodological, or fit-related.