Garment defects are not just a factory problem. They affect fit approval, bulk consistency, delivery timing, claim risk, and how confidently a brand can reorder the same style. In apparel production, many issues that look small at first, such as seam puckering, color variation, twisting, or a few skipped stitches, can become expensive once they repeat across hundreds or thousands of units. For sourcing teams and product developers, the goal is not only to find defects during inspection. The real goal is to understand what causes them early enough to prevent them.
If you need a broader framework for how quality should be checked from sample review through final inspection, this practical apparel QC guide helps connect defect control with real checkpoints such as workmanship review, measurement verification, visual inspection logic, and approval timing before bulk production moves too far.
What garment defects are and why they matter
In simple terms, garment defects are problems that make a piece fail its intended standard. That standard may relate to appearance, measurements, stitching, fabric performance, labeling, wash durability, or construction accuracy. Some defects are obvious on first look. Others only appear after washing, wearing, or comparing one size to another.
From a quality control perspective, defects usually fall into a few practical groups: visual defects, measurement defects, construction defects, fabric defects, and performance defects. A shirt can look acceptable on a hanger and still fail because the side seam twists after washing, the chest width falls outside tolerance, or the placket does not sit flat. That is why experienced teams do not rely on appearance alone.
For buyers, the key issue is severity. A loose thread may be easy to trim and may not affect use. A broken seam at armhole stress points is different. A slight shade variation inside a mixed-size carton may become a retail complaint. A 4 percent shrinkage issue can destroy fit consistency across a size run. Not every defect should trigger lot rejection, but every recurring defect should trigger root-cause review.
Common garment defects found in sampling and inspection
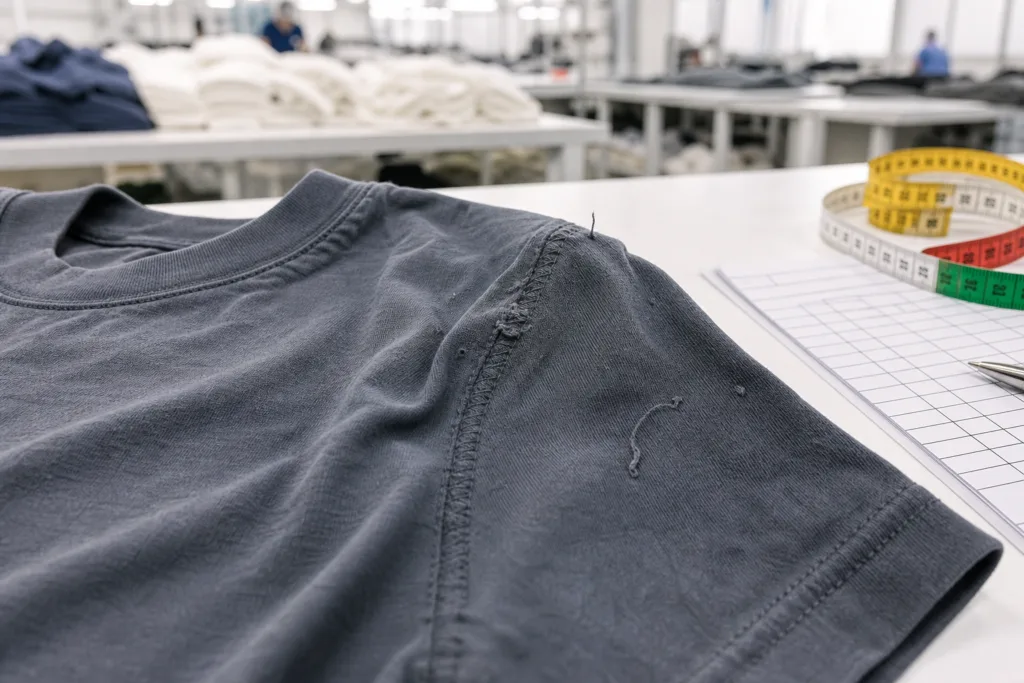
Loose threads and poor thread trimming
This is one of the most common workmanship issues in both samples and bulk goods. Loose threads do not always mean the seam is structurally weak, but they create an unfinished look and can suggest rushed sewing or weak finishing control. When thread tails are left at collar joins, side seams, hems, or button areas, the garment can fail presentation standards even if the measurements are correct.
Skipped stitches and broken seam continuity
Skipped stitches occur when the stitch line does not form properly, leaving gaps in the seam. This may happen at thick seam joins, rib attachment, stretch areas, or curved parts such as armholes. In production, skipped stitches are more serious than cosmetic loose threads because they can reduce seam security. Teams reviewing sewing quality should understand basic stitch density, tension balance, and seam suitability for fabric type. A practical guide to stitch density and SPI is useful when checking whether the stitch setup matches fabric weight and seam function.
Color variation and shade inconsistency
Color problems can show up as panel-to-panel shade difference, dye lot variation, uneven washing effect, crocking, fading, or trim mismatch. These issues are especially visible in dark shades, pigment washes, heathers, and garments assembled from multiple fabric lots. A garment may pass sewing inspection and still fail visual approval if sleeves, body panels, and neck trim do not match under the agreed light source.
Shrinkage and dimensional change
Shrinkage is one of the most costly defects because it affects fit, measurement compliance, and customer satisfaction after use. Knit tops, fleece styles, washed cotton garments, and blended fabrics can all behave differently depending on fiber, knit structure, finish, and care process. Sample approval should not rely only on pre-wash measurements. When teams need objective dimensional change data, standardized dimensional change testing for shrinkage prevention provides a recognized basis for measuring wash-related size change.
Twisting, skewing, and seam torque
Twisting usually appears when side seams or leg seams rotate after washing or wearing. This is common in some single jersey knits, tubular constructions, and fabrics with uncontrolled skew. Buyers often notice it first in T-shirts, leggings, joggers, and casual knit bottoms. The garment may measure correctly when flat, but once worn or washed, the seam line shifts off center and the product looks unstable.
Seam puckering and poor appearance after wash
Seam puckering happens when the seam line gathers or wrinkles instead of lying flat. Causes may include sewing tension imbalance, fabric-feed mismatch, incompatible thread, unstable fabric, or finishing distortion. It becomes more serious when it worsens after laundering. In sample approval, post-laundry review matters because not all defects are visible before wash. Standards used for post-wash appearance and defect assessment help explain why seam smoothness, color change, and overall appearance should be reviewed after washing, not only before it.
How these defects happen in real production
Fabric issues
Many garment problems start before cutting. Fabric bowing, skewing, shade inconsistency, GSM variation, low recovery, weak dye fixation, and unstable finishing can all create defects later. If the fabric relaxes differently after spreading, cutting accuracy may suffer. If the fabric shrinks unevenly, garment measurements may pass before wash and fail after wash. If the fabric face is delicate, needle marks or seam grin may appear more easily.
In apparel sourcing practice, it is risky to treat all cotton jerseys, interlocks, fleeces, or poplins as interchangeable. Similar fiber content does not guarantee the same sewing behavior or wash stability. Fabric approval should consider construction, finish, and intended care conditions, not only composition.
Sewing machine settings and seam engineering
Wrong needle size, poor needle condition, incorrect presser foot pressure, high thread tension, and unsuitable SPI can all create defects. A seam that looks fine on a first sample can fail in bulk when sewing speed increases or operators handle the fabric differently. Stretch fabrics often need different seam types and thread behavior than rigid woven fabrics. Thick seam intersections may need setup adjustment to avoid skipped stitches or broken needle damage.
Operator handling and workmanship variation
Operator skill matters most in visually sensitive areas: collar setting, placket alignment, pocket placement, topstitch parallelism, sleeve setting, and hem consistency. Even with a correct pattern and approved fabric, the garment can fail if critical operations are not standardized. This is where workmanship comments in the tech pack need to be specific. Saying “neat sewing” is not enough. Teams should define stitch type, edge margin, tolerance, matching points, and what is not acceptable.
Washing and finishing problems
Garment washing introduces another risk layer. Enzyme wash, silicone wash, pigment wash, or simple domestic wash can affect shade, hand feel, size, skew, seam appearance, and trim behavior. Heat setting, pressing temperature, folding pressure, and packing moisture also influence final appearance. In many projects, the defect is not caused by sewing alone. It is caused by the combination of fabric behavior and finishing conditions.
Pattern, grading, and cutting errors
Some defects are actually specification problems. Uneven hems, mismatched panel lengths, poor sleeve pitch, collar roll issues, or twisted leg balance may start with pattern shape or grading logic rather than operator error. Cutting on off-grain fabric, incorrect marker placement, or mixing components from different lays can create repeated problems that no final inspection can truly fix. This is one reason many teams use sample review checklist for garment development procedures before approving size sets or PP samples.
How to spot garment defects during the sample stage
The sample stage is where defect prevention is cheapest. Once bulk cutting starts, the same issue can repeat across the full order. During sample review, do not limit the check to overall look and fit on a mannequin. Review the garment inside and outside, before wash and after wash, on table and on body.
Start with a visual workmanship review. Check seam straightness, stitch formation, thread color match, edge finishing, topstitch consistency, bartack placement, label attachment, print or embroidery registration, and fabric appearance under normal light. Then move to measurements and compare against the spec. After that, test the garment in the way the final user will experience it: wash it, dry it as intended, and inspect again.
For brands building repeatable quality systems, Apparel Wiki generally recommends treating the sample stage as a risk filter, not as a design-only milestone. A beautiful sample that has not been checked for stability, measurement consistency, or construction repeatability can create misleading confidence.
Sample-stage prevention checklist
| Checkpoint | What to Review | Why It Matters |
|---|---|---|
| Fabric testing | Shrinkage, shade, GSM, hand feel, stretch, recovery | Prevents dimensional and appearance surprises later |
| Stitch setting | SPI, tension, needle suitability, seam type | Reduces skipped stitches, puckering, seam failure |
| Wash test | Measurement change, color change, seam appearance, twisting | Shows defects that are invisible before laundering |
| Fit review | Balance, drape, movement, stress points | Separates pattern issues from sewing issues |
| Measurement verification | POM checks against spec and tolerance | Stops avoidable bulk size inconsistency |
| Construction confirmation | Seam finish, placket build, hem method, trims | Confirms that approved design is producible |
One detail many new brands overlook is sequencing. Fabric testing should happen before final sample approval, not after bulk fabric is already booked. If shrinkage or wash torque is discovered too late, teams may be forced to change pattern measurements, care instructions, or fabric treatment under time pressure. For projects where wash behavior matters, it helps to understand how to perform a fabric shrinkage test before approving the bulk standard.
Garment inspection methods that actually catch problems
Visual inspection
Visual inspection should cover both garment appearance and component consistency. Check shade variation within the lot, panel matching, stripe or plaid alignment, print placement, embroidery quality, stain marks, needle damage, open seams, uncut threads, and pressing marks. Inspect under consistent lighting and compare suspect pieces against an approved reference sample where possible.
Measurement inspection
Measurement control is not only about finding a garment that is too big or too small. It is about checking whether the lot stays within the allowed range across size points and critical dimensions. Chest, body length, sleeve length, shoulder width, waist, hip, inseam, rise, and opening measurements should be based on a clear method. A strong overview of garment measurement tolerance helps teams define which differences are acceptable and which should trigger corrective action.
Seam and stitch checks
Inspect seams at stress areas first: armholes, crotch seams, pocket corners, plackets, collar joins, zipper ends, and hem starts and stops. Look for skipped stitches, broken stitches, seam slippage, insecure back-tacking, excessive roping, and seam grin. Turn garments inside out when needed. Some factories present clean outside appearance while inside workmanship tells a different story.
Wash performance checks
Wash checks should be part of approval when the product category or fabric type has known risk. Compare before-and-after measurements, observe twisting, assess color change, evaluate seam puckering, and note trim damage such as label curling or elastic distortion. For teams buying fashion-washed garments or knit basics, this step is often where the most expensive surprises appear.
How to define acceptable and unacceptable defects
Not every imperfection has the same impact. Teams need a quality standard that distinguishes between critical, major, and minor defects. A critical defect is something unsafe or functionally unacceptable. A major defect affects saleability, fit, durability, or obvious appearance. A minor defect is visible but limited and may not affect use.
For example, one loose thread at an inside overlock tail is usually minor if the seam is secure. A skipped stitch at the armhole is major because it can open during wear. A strong shade mismatch between left and right sleeve is major because the garment appearance is clearly compromised. A measurement 0.3 cm outside tolerance may be acceptable on a low-risk point, while the same deviation at collar opening or chest width may not be.
The key is to agree on standards before inspection starts. Without that, one inspector may pass what another rejects. Defect photos, approved counter samples, workmanship notes, and point-by-point tolerance rules reduce subjective decisions.
Rework and repair risks that buyers often underestimate
Rework sounds cheaper than rejection, but it often creates new inconsistency. Thread trimming is simple. Removing and resetting a collar, side seam, zipper, or print placement is not. Once a garment is opened and resewn, needle marks, puckering, panel distortion, or measurement shift may appear. Rewashed rework lots can also create new shade variation.
From a sourcing perspective, every repair decision should consider four things: direct repair cost, added lead time, quality consistency after repair, and customer-facing risk. If 5 percent of a lot needs a simple fix, repair may be reasonable. If 40 percent shows post-wash skew or size shrinkage, repair may not solve the real problem because the defect is systemic, not isolated.
How to reduce garment defects before bulk production
Write better tech packs
Many recurring quality problems start with unclear specifications. A stronger tech pack should define measurements, tolerances, stitch type, seam allowance where relevant, construction details, trim placement, labeling, artwork position, fabric information, and wash expectations. Clear comments reduce guesswork.
Use precise workmanship comments
Comments should identify what to control, where to control it, and how to judge it. For example: “Topstitch 1/16 inch from edge, even appearance, no seam grin, no skipped stitches at pocket corners.” This is far more useful than “good finishing required.”
Strengthen pre-production approval
Pre-production approval should confirm the sealed sample, tested fabric, approved wash result, trim match, measurement spec, packing method, and inspection criteria. If the PP sample is approved with unresolved comments, those problems usually reappear in bulk. This detail may look small, but it can create problems later if it is not confirmed early.
Common mistakes brands make when trying to control garment defects
- Approving samples based on look only: A clean photo or nice fit is not enough without measurement and wash review.
- Skipping fabric risk checks: Many defects begin with unstable or mismatched fabric, not factory carelessness.
- Using vague workmanship language: Unclear comments produce inconsistent interpretation.
- Inspecting too late: Final inspection can catch problems, but it cannot undo bulk fabric cutting or sewing already completed.
- Ignoring repeat defects: If the same issue appears across samples, it is usually a process problem, not a one-off mistake.
- Treating all deviations equally: Teams need severity logic, otherwise time is wasted on minor issues while major risks pass through.
Conclusion

Controlling garment defects is not about finding fault at the end of production. It is about building better decisions earlier, from fabric approval and pattern review to stitch setting, wash testing, and inspection criteria. The most effective teams understand root cause, define clear acceptance standards, and use the sample stage to expose repeat risks before bulk volume makes them expensive. For apparel brands, product developers, and sourcing managers, better defect control usually starts with clearer specifications and more disciplined checkpoints, not just stricter final inspection.
FAQs
Which garment defects are usually the most serious?
The most serious defects are the ones that affect safety, function, durability, or obvious sellable appearance. In real production, this often includes broken or skipped stitches at stress points, severe measurement failures, major shade variation, twisting after wash, and shrinkage that changes fit beyond tolerance.
Can all garment defects be repaired?
No. Some defects are easy to correct, such as loose thread trimming or replacing a missed bartack. Others are difficult or unreliable to repair, including major shrinkage, fabric skew, repeated shade variation, and construction problems that distort the garment after resewing. The repair decision should always consider consistency, cost, and lead time.
When should a lot be rejected instead of reworked?
A lot should be considered for rejection when the defect is systemic, not isolated. If the issue affects wash performance, core measurements, fabric appearance, or a large percentage of units, rework may not solve the root problem. Rejection or hold-for-investigation is more appropriate when correction would still leave inconsistent quality.
What is the best time to catch garment defects?
The best time is during material approval and sample review, before bulk cutting and sewing are complete. Defects found at proto, fit, size set, or PP sample stage are much cheaper to fix than defects found during final inspection or after shipment.
How many measurements should be checked during inspection?
The answer depends on the garment type and risk level, but inspectors should always prioritize critical points of measure such as chest, body length, sleeve length, waist, hip, inseam, rise, and opening dimensions where applicable. The point is not to measure everything blindly, but to control the dimensions that most affect fit and consistency.
Do small defects really matter for bulk orders?
Yes, especially when a small defect repeats across the order. One minor issue on one sample may be manageable, but the same issue on thousands of units can create rework cost, approval delays, and customer complaints. Repetition is often more important than the defect looking small on a single garment.