A seam elasticity procedure is a controlled way to examine how a sewn seam extends, recovers, and resists damage under a defined condition. In practical terms, it compares seam samples while you observe opening between stitches, thread breakage, skipped stitches, fabric damage, permanent distortion, and changes in appearance. The goal is not to apply one universal pass-or-fail number, but to judge the sewn assembly against the garment’s intended use and project requirements. Apparel Wiki is an independent educational publication; support through our Sponsor page does not make the site a manufacturer, factory, laboratory, or certification body.
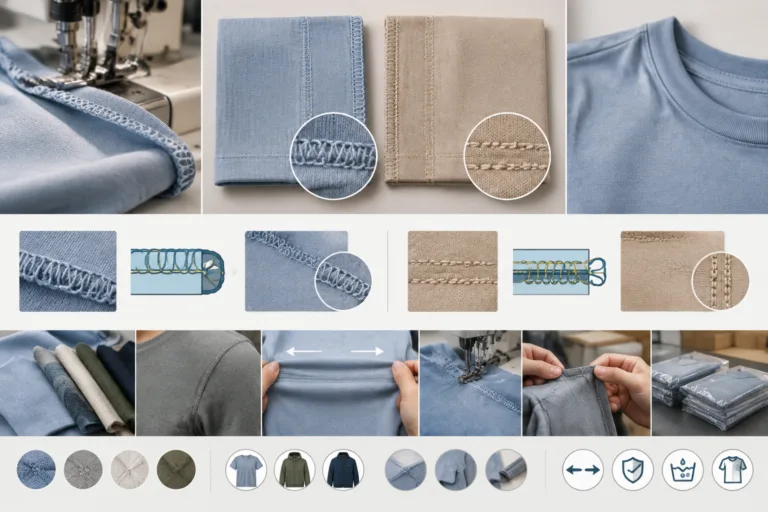
Seam elasticity is the ability of a seam and its surrounding fabric assembly to extend without unacceptable structural or visual failure. It is related to fabric stretch, but it is not the same thing. Thread behavior, stitch formation, seam construction, needle selection, needle damage, machine feeding, fabric direction, and the number of layers can all change how a seam behaves. A fabric may extend well on its own while the sewn seam restricts movement or fails first.
What Is a Seam Elasticity Procedure?
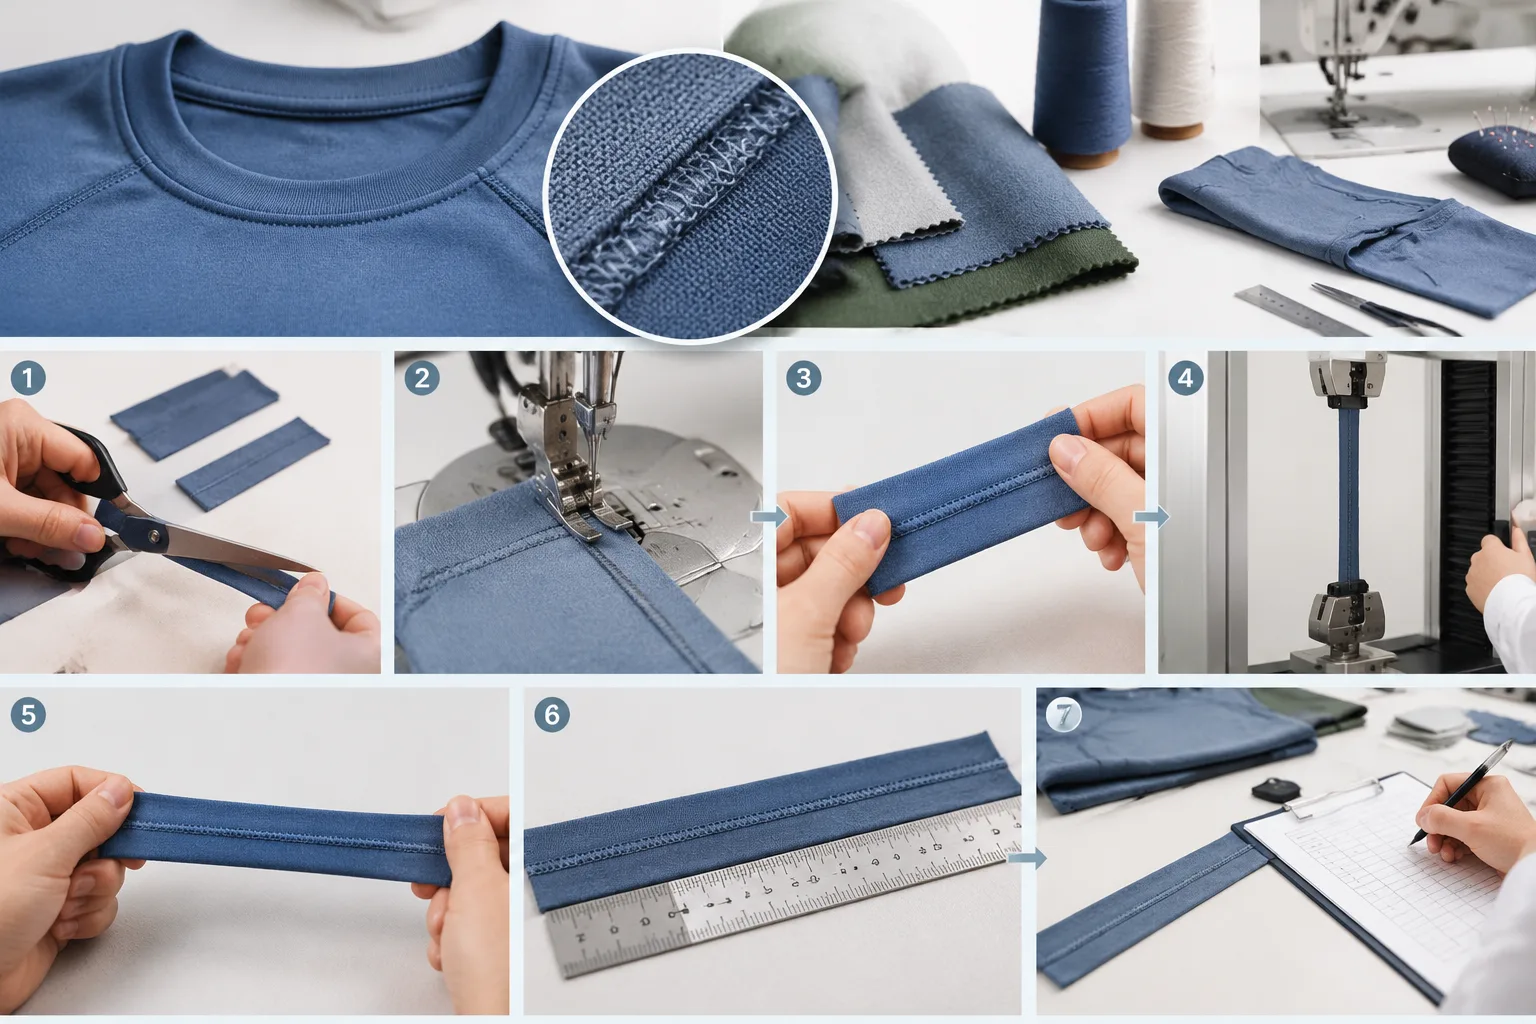
A seam elasticity procedure is a defined comparison of sewn samples. Before applying extension, the evaluator identifies the seam construction, the direction of movement, the intended garment use, the samples being compared, and the observations that matter. The samples are then extended using a consistent project method, inspected during extension, released, and checked again for recovery and residual damage.
This makes the procedure a development and screening tool rather than automatically a standardized laboratory test. A practical in-house assessment can help identify a weak construction or compare controlled sewing changes. It does not replace a customer-mandated method, a contractual performance report, or formal laboratory testing. For example, ASTM D1683 addresses failure in sewn seams of woven apparel under a specified test method; that type of reference should not be treated as a universal seam-elasticity requirement.
The acceptance rule should be product-specific. A seam in a close-fitting stretch garment may need to accommodate body movement and recover with limited visible distortion. Another seam may be expected to remain comparatively stable and resist opening rather than extend freely. The relevant question is whether the complete sewn assembly performs acceptably for its location, construction, materials, care route, and customer or brand specification.
Why Seam Elasticity Matters in Garment Development
Seam elasticity affects more than a laboratory-style result. It can influence fit, comfort, appearance, durability, and the risk of failure during wear. The issue is especially relevant wherever the garment must accommodate body motion or where the fabric is expected to extend. Examples can include movement areas, close-fitting panels, stretch constructions, and seams that join materials with different behavior, but the appropriate locations depend on the product rather than on a fixed garment-category rule.
A seam may restrict movement even when the fabric itself has adequate stretch. Extension can instead concentrate at the stitch line, causing the seam to open, the thread to break, or the needle holes to enlarge. In other cases, the seam may remain closed but create puckering, rippling, or permanent distortion that affects appearance and fit. These are different quality concerns and should be recorded separately rather than reduced to one general judgment that the seam “passed” or “failed.”
Direction also matters. The sewn assembly should be evaluated in the direction in which it will extend in the finished garment. A sample cut across the fabric’s dominant stretch direction may behave differently from one cut along it. Layer count, seam allowance, elastics, bindings, finishing operations, and the interaction between joined materials can also change the result. For that reason, a simple fabric stretch check cannot stand in for evaluation of the actual seam construction.
Recovery is another project-dependent consideration. Some seams must extend temporarily and return close to their original shape after movement. Others are primarily expected to remain stable under use, with little visible opening or distortion. If repeated movement, laundering, or finishing is relevant to the product, the evaluation plan should state whether those conditions are included. Do not assign a fixed recovery expectation without a product specification or validated test requirement.
Prepare a Comparable Seam Elasticity Sample
Useful seam stretch testing begins with comparable samples. The purpose of sample preparation is to ensure that differences in results reflect the controlled sewing variable being examined, not accidental changes in fabric direction, construction, handling, or machine setup. Use the materials and construction intended for the garment whenever possible, including relevant layers, elastics, bindings, and finishing operations.
Record the sample identity before sewing. At minimum, the working record should identify the fabric or material batch, stretch direction, layer count, seam allowance, thread, needle, stitch or seam type, machine, settings, and operator or shift where traceability matters. Mark the direction in which the seam will be extended. Cut samples consistently and handle them in the same way. If a project specification or formal method requires conditioning, follow that requirement consistently rather than adding an unsupported conditioning period.
Variables worth controlling
- Material: Use the same fabric type, batch where practical, direction, layers, and attached components.
- Construction: Keep seam allowance, stitch or seam formation, and finishing operations consistent.
- Sewing setup: Record machine identity, relevant settings, speed where controlled, and operator or shift.
- Needle and thread: Match needle point, needle size, thread size, fabric density, and fabric stretch as a starting point, then confirm the combination on the actual machine and material.
- Measurement terms: Keep SPI, stitch length, and multi-needle spacing distinct. SPI refers to stitches per inch; stitch length describes the distance between successive stitches along the seam, while needle spacing is a separate machine dimension.
Supplier recommendations can provide a sensible starting point for needle and thread selection, but they are not a universal production setting. Check the actual sample at the intended material, layer count, and target machine conditions. A needle that is too large or otherwise unsuitable may enlarge holes or change the appearance, while an incompatible thread or feeding condition may contribute to skipped stitches, breakage, or uneven extension.
For comparison work, prepare a baseline and enough additional samples to examine controlled changes. Possible comparisons include a different thread, needle choice, stitch formation, feed setting, or seam construction. Change one relevant variable at a time where practical. The purpose is to make the result interpretable, not merely to produce a sample that looks acceptable in isolation.
A Step-by-Step Procedure for Evaluating Seam Elasticity
Begin by defining what the comparison must show. Identify the seam construction, fabric direction, intended garment use, extension direction, comparison samples, and observations that will determine the next decision. The goal may be to check movement comfort, prevent seam opening, compare sewing adjustments, or confirm that a development sample remains stable after extension. These are different questions, so the evaluation should be tied to the product requirement rather than an assumed universal pass level.
Inspect each sample before applying extension. Record the material identity, seam location, layer count, construction, and relevant sewing settings. Look for puckering, skipped stitches, uneven feeding, visible needle damage, loose or tight thread formation, and differences between samples. A seam that already varies before testing cannot provide a reliable comparison. For terminology and construction descriptions, the ASTM D6193 practice for stitches and seams can serve as a reference point, but it does not establish a universal elasticity threshold for every garment.
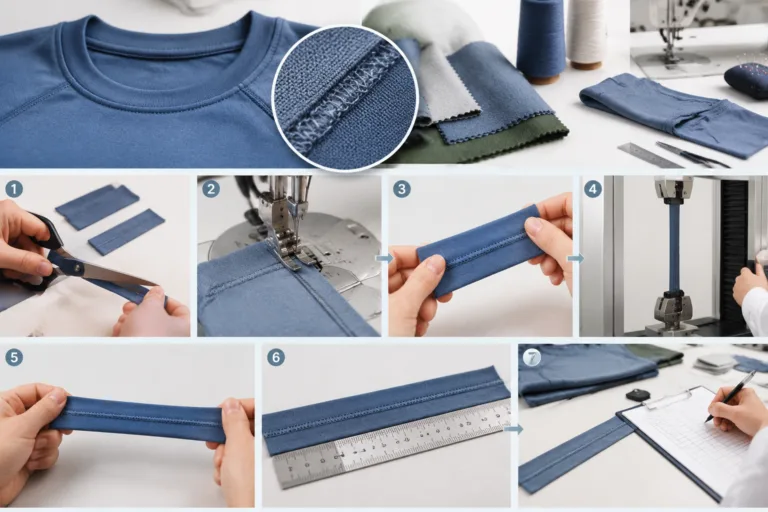
Mark the direction in which the seam will be extended and use the same reference points for comparable samples. Apply extension through a defined project method that can be repeated. Depending on the available equipment and specification, record the applied length, force, displacement, or another relevant test condition when available. Do not invent a force, rate, cycle count, or specimen dimension simply to make an informal screening exercise appear standardized.
Observe the assembly while it extends. Note whether the seam opens between stitches, the thread breaks, stitches skip, the fabric tears, needle holes enlarge, or the seam develops permanent distortion. Also record changes in appearance, including severe puckering, uneven feeding, or a construction that restricts the surrounding fabric. Visual appearance and structural performance are related but not interchangeable: a neat-looking seam may still be weak, while an unattractive result may require a separate appearance investigation.
Release the extension and inspect the sample again. Check whether the seam and surrounding fabric recover, whether residual distortion remains, and whether damage becomes easier to see after relaxation. Repeat the same sequence across the baseline and comparison samples. Record results by sample identification and, where traceability matters, by machine, material batch, operator, shift, and corrective-action status. This creates a useful seam elasticity procedure for development screening, while leaving formal reporting to the applicable customer, laboratory, or test specification.
How to Diagnose Poor Seam Elasticity Results
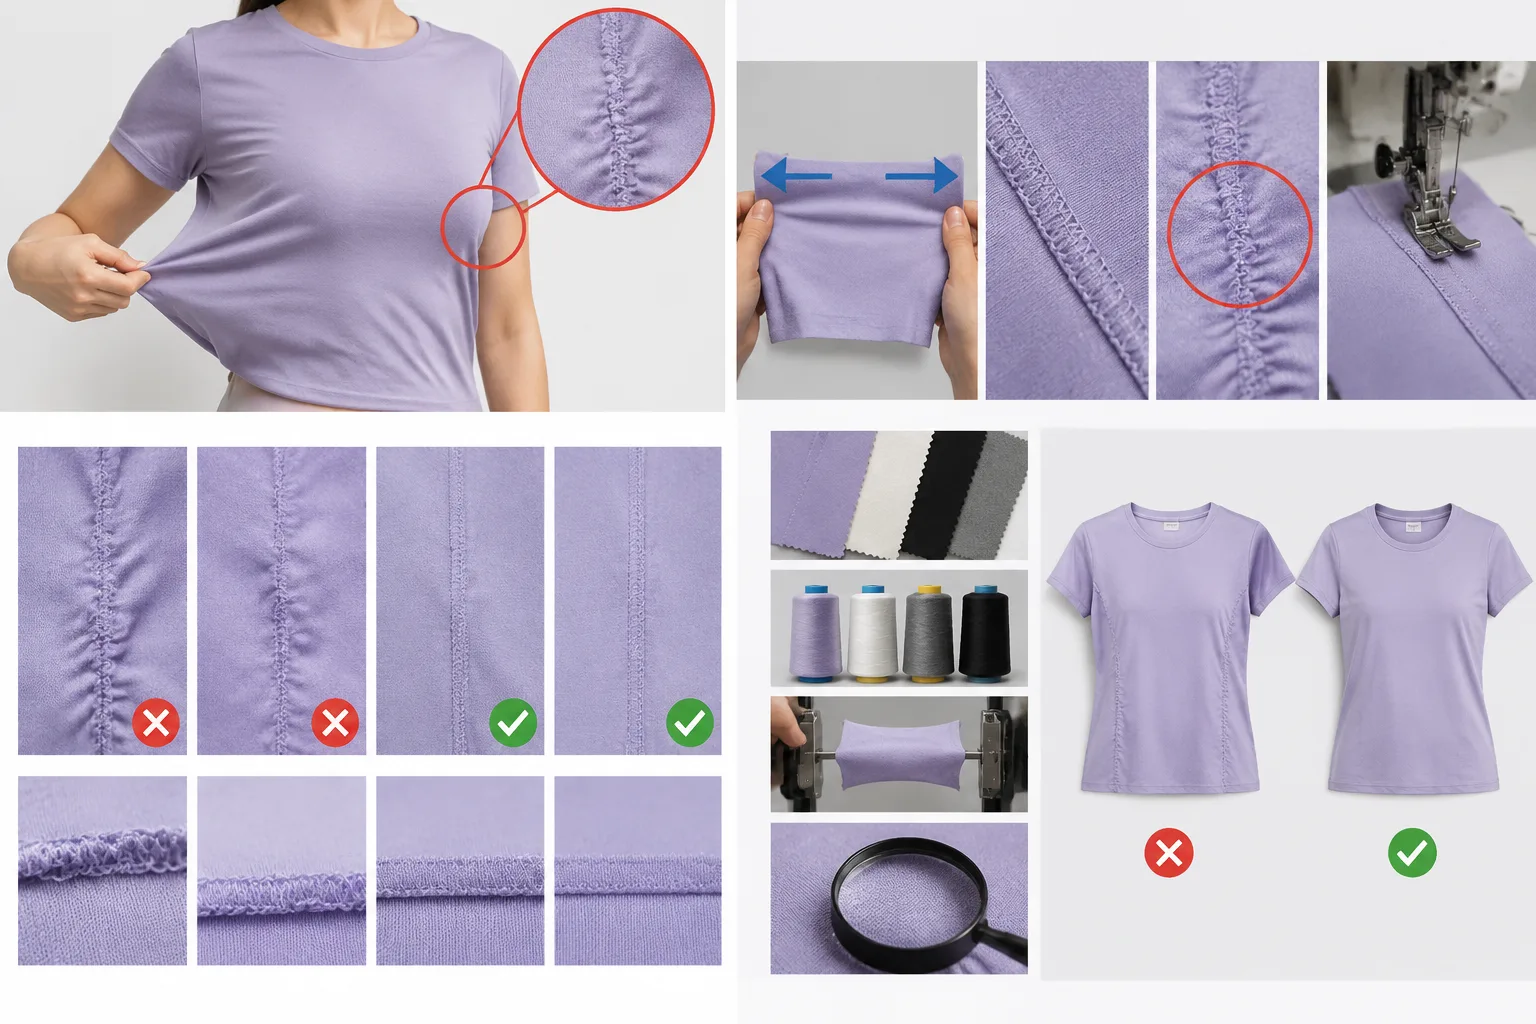
Start by naming the failure accurately. Seam opening, thread breakage, skipped stitches, fabric tearing, enlarged needle holes, puckering, and poor recovery do not automatically have the same cause. A seam may fail because its construction cannot accommodate the extension, because the thread and fabric are poorly matched, or because feeding and tension conditions create an uneven assembly. One photograph or one failed sample is rarely enough to identify the responsible variable.
Compare like with like before changing the machine. Keep the material batch, layer count, seam direction, machine, speed, and operator conditions consistent where practical. Then change one relevant factor at a time, such as thread tension, feeding, stitch or seam construction, needle selection, or material compatibility. Match needle point, needle size, thread size, fabric density, and fabric stretch as a starting principle, then confirm the combination on the actual machine and layers. A needle that is too large or otherwise unsuitable may enlarge holes or change appearance, but no single needle setting is correct for every fabric.
Puckering deserves its own investigation because similar surface wrinkles can have different origins. Thread tension, feeding, structural crowding, and differential shrinkage after washing or finishing may all be relevant. When the product will undergo laundering or another finishing process, compare untreated and processed samples under the same evaluation conditions. This helps separate a sewing-room issue from a change introduced later in the product route.
Keep the measurement terms distinct while reviewing the sewing setup. SPI means stitches per inch, stitch length describes the distance between successive stitches along the seam, and multi-needle spacing is a separate machine dimension. Confusing these values can lead to an ineffective adjustment. After a correction, inspect newly produced samples rather than treating a repaired seam as proof that the process is stable. Repair may restore local appearance without preventing the same defect from returning.
Turn the Results Into a Sewing and Quality Decision
Use the project requirement to decide whether the result is acceptable. Approval should consider the intended appearance, extension behavior, recovery, and structural condition together. A sample that survives extension but remains badly distorted may not be suitable for its intended use. Conversely, an internal screening result should not be presented as certification, a legal conclusion, or a formal laboratory report.
When the cause is uncertain, adjust one relevant variable, repeat the same procedure, and compare the new record with the baseline. If the result improves, document the change and confirm it on additional comparable samples. Record the approved construction and operating window, not only a final photograph. A practical record can include:
- material identity, batch, fabric direction, and layer count;
- seam and stitch construction, needle and thread details, and relevant machine settings;
- extension direction and test condition used for the comparison;
- appearance, opening, breakage, fabric damage, recovery, and residual distortion;
- disposition, corrective action, retest status, machine, operator, and shift where relevant.
Escalate the issue when it affects a contractual requirement, customer approval, regulated product, disputed claim, or formal performance report. A qualified laboratory or responsible quality and engineering team can select the applicable method and acceptance criteria. Apparel Wiki is an independent educational publication, not a manufacturer, factory, laboratory, certifier, or service provider. For internal development, this procedure is a structured screening tool; it does not replace a named standard or customer-specific protocol.
As a next step, turn the completed records into a small comparison set: retain the baseline, identify the changed variable, and repeat the evaluation under the same conditions. Reviewing the samples side by side makes it easier to separate a construction problem from a material or machine-setting problem. The Apparel Manufacturing Tools area may also help organize related development and quality work.
How is seam elasticity different from fabric stretch?
Fabric stretch describes how the material extends. Seam elasticity describes the behavior of the sewn assembly, including thread, stitch formation, seam construction, needle effects, feeding, and the surrounding fabric. A stretchy fabric can therefore have a restrictive or failing seam.
What should be recorded during a seam elasticity procedure?
Record the material, direction, layers, seam construction, needle, thread, machine settings, sample identity, extension condition, observations, recovery, and disposition. Add machine, batch, operator, or shift details when traceability is important.
Can seam elasticity be evaluated with an in-house sample test?
Yes. A controlled in-house comparison can support development and process screening when the method is defined and repeatable. It should not be treated as a substitute for a customer-required or formally validated laboratory test.
Why does a seam open when the fabric stretches?
The sewn assembly may not accommodate the fabric’s extension. Possible investigation paths include seam construction, thread compatibility, needle damage, feeding, tension, stitch formation, and fabric direction. The visible opening alone does not identify one universal cause.
How should skipped stitches or thread breakage be investigated during seam stretch testing?
Confirm the material, layers, needle, thread, machine settings, and extension direction first. Compare controlled changes one at a time, inspect the unextended seam, and repeat the evaluation on new samples. Do not assume that repair has corrected the underlying process.
When is a formal laboratory test necessary?
Seek formal evaluation when a contract, customer specification, regulated product, disputed claim, or performance report requires a validated method or documented result. The applicable laboratory or quality authority should define the method and acceptance criteria.